云南汉王科技Java8 SpringBoot框架开发培训
Java8 SpringBoot框架开发培训 本次培训将通过IntelliJ IDEA编程语言开发的集成环境创建一个SpringBoot项目,在该项目中整合MyBatis Plus、Lombok和Swagger2现实一个标准的有两张数据库表(用户资料表、文章信息表)的简易个人博客的服务器端RESTful API开发。
一、预备知识
-
RESTful API是目前最流行的 API 设计规范,用于 Web 数据接口的设计。具体参看《阮一峰:RESTful API 最佳实践》
-
SpringBoot- Spring Boot 官网
- Spring Boot 百度百科
- Spring Boot是一个简化Spring开发的框架。通过简化配置来进一步简化了Spring应用的整个搭建和开发过程。
- 在使用Spring Boot时只需要配置相应的Spring Boot就可以用所有的Spring组件,简单的说,spring boot就是整合了很多优秀的框架,不用我们自己手动的去写一堆xml配置然后进行配置。从本质上来说,Spring Boot就是Spring,它做了那些没有它你也会去做的Spring Bean配置。
-
MyBatis Plus使用Mybatis发现需要在mapper.xml中写很多重复的简单CRUD(增删改查),使用MybatisPlus可以大大简化这部分代码,在
MyBatis的基础上只做增强不做改变,为简化开发、提高效率而生。- MyBatis Plus 官网
- 特性
- 无侵入
只做增强不做改变,引入它不会对现有工程产生影响,如丝般顺滑
- 损耗小
启动即会自动注入基本 CURD,性能基本无损耗,直接面向对象操作
- 强大的 CRUD 操作
内置通用 Mapper、通用 Service,仅仅通过少量配置即可实现单表大部分 CRUD 操作,更有强大的条件构造器,满足各类使用需求
- 支持 Lambda 形式调用
通过 Lambda 表达式,方便的编写各类查询条件,无需再担心字段写错,Java8中让人又爱又恨的Lambda表达式
- 支持多种数据库
支持 MySQL、MariaDB、Oracle、DB2、H2、HSQL、SQLite、Postgre、SQLServer2005、SQLServer 等多种数据库
- 支持主键自动生成
支持多达 4 种主键策略(内含分布式唯一 ID 生成器 - Sequence),可自由配置,完美解决主键问题
- 支持 XML 热加载
Mapper 对应的 XML 支持热加载,对于简单的 CRUD 操作,甚至可以无 XML 启动
- 支持 ActiveRecord 模式
支持 ActiveRecord 形式调用,实体类只需继承 Model 类即可进行强大的 CRUD 操作
- 支持自定义全局通用操作
支持全局通用方法注入( Write once, use anywhere )
- 支持关键词自动转义
支持数据库关键词(order、key……)自动转义,还可自定义关键词
- 内置代码生成器
采用代码或者 Maven 插件可快速生成 Mapper 、 Model 、 Service 、 Controller 层代码,支持模板引擎,更有超多自定义配置等您来使用
- 内置分页插件
基于 MyBatis 物理分页,开发者无需关心具体操作,配置好插件之后,写分页等同于普通 List 查询
- 内置性能分析插件
可输出 Sql 语句以及其执行时间,建议开发测试时启用该功能,能快速揪出慢查询
- 内置全局拦截插件
提供全表 delete 、 update 操作智能分析阻断,也可自定义拦截规则,预防误操作
- 内置 Sql 注入剥离器
支持 Sql 注入剥离,有效预防 Sql 注入攻击
- 无侵入
- 核心功能
- 代码生成器
AutoGenerator 是 MyBatis-Plus 的代码生成器,通过 AutoGenerator 可以快速生成 Entity、Mapper、Mapper XML、Service、Controller等各个模块的代码,极大的提升了开发效率。
- CRUD 接口
即增删改查数据库接口
- 条件构造器
几乎涵盖所有的数据库查询where条件,并支持原始sql。
- 分页插件
可通过mybatis-plus 自动分页。
- Sequence主键
实体主键支持Sequence,自动生成主键。
- 代码生成器
- 扩展插件
- 通用枚举
解决了繁琐的配置,让 mybatis 优雅的使用枚举属性!
- 性能分析插件
性能分析拦截器,用于输出每条 SQL 语句及其执行时间
- 动态数据源
基于springboot的快速集成多数据源
- 分布式事务
支持 rabbit 实现可靠消息分布式事务
- 通用枚举
-
Lombok- Lombok 官网
- Lombok简介、使用、工作原理、优缺点
- Lombok能以简单的注解形式来简化java代码,提高开发人员的开发效率。例如开发中经常需要写的javabean,都需要花时间去添加相应的getter/setter,也许还要去写构造器、equals等方法,而且需要维护,当属性多时会出现大量的getter/setter方法,这些显得很冗长也没有太多技术含量,一旦修改属性,就容易出现忘记修改对应方法的失误。
- Lombok能通过注解的方式,在编译时自动为属性生成构造器、getter/setter、equals、hashcode、toString方法。出现的神奇就是在源码中没有getter和setter方法,但是在编译生成的字节码文件中有getter和setter方法。这样就省去了手动重建这些代码的麻烦,使代码看起来更简洁些。
-
Swagger2- Swagger2 官网
- 自动生成在线API接口文档
- 由于Spring Boot能够快速开发、便捷部署等特性,相信有很大一部分Spring Boot的用户会用来构建RESTful API。而我们构建RESTful
- API的目的通常都是由于多终端的原因,这些终端会共用很多底层业务逻辑,因此我们会抽象出这样一层来同时服务于多个移动端或者Web前端。
二、创建项目
-
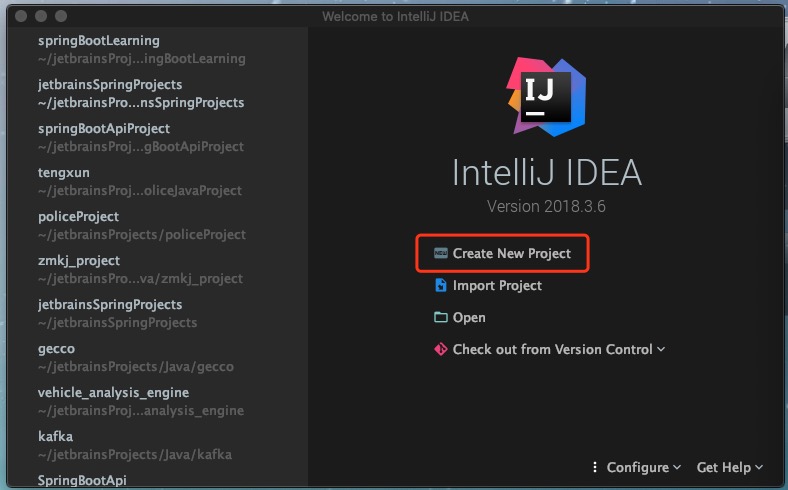
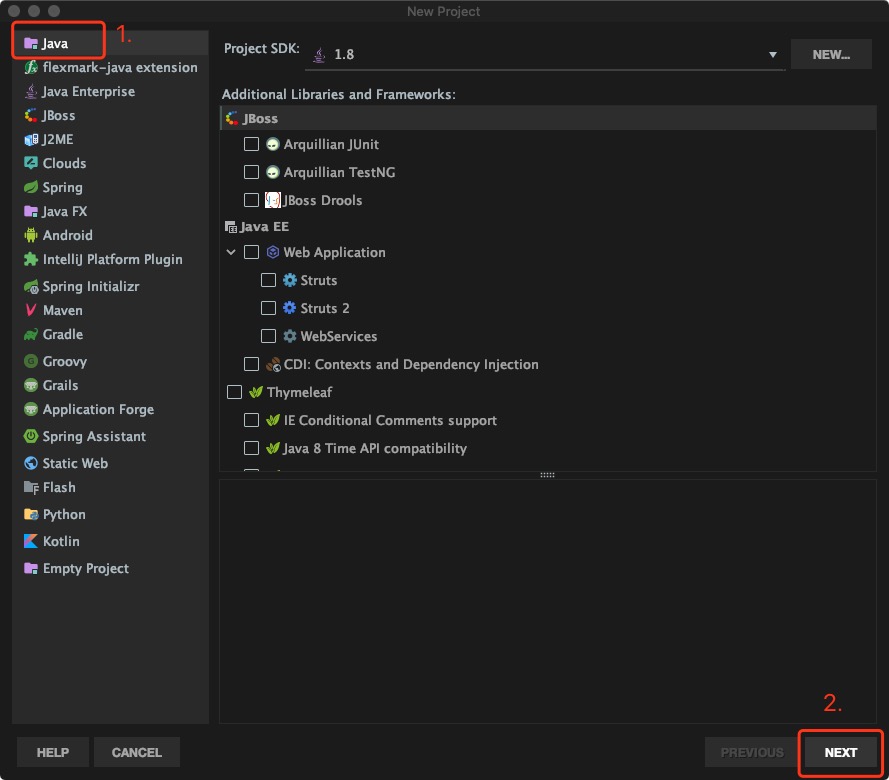
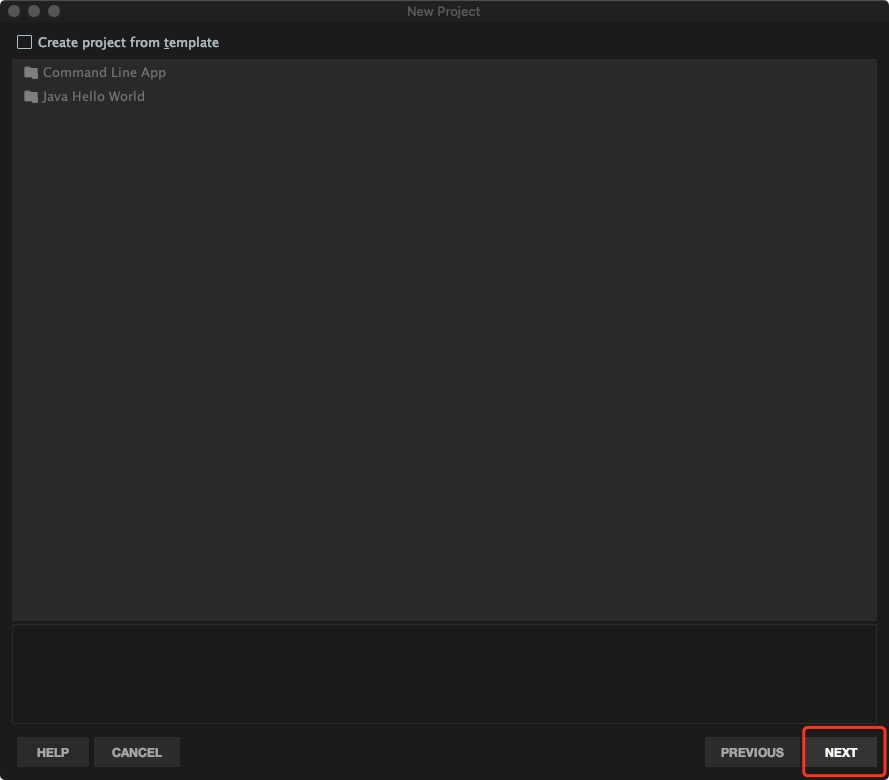
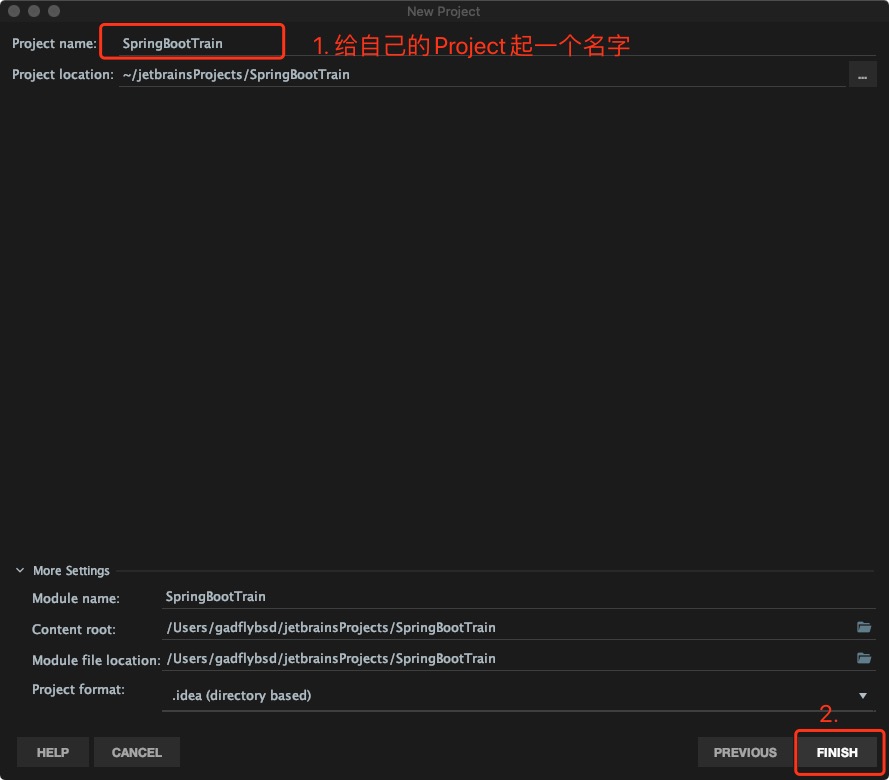
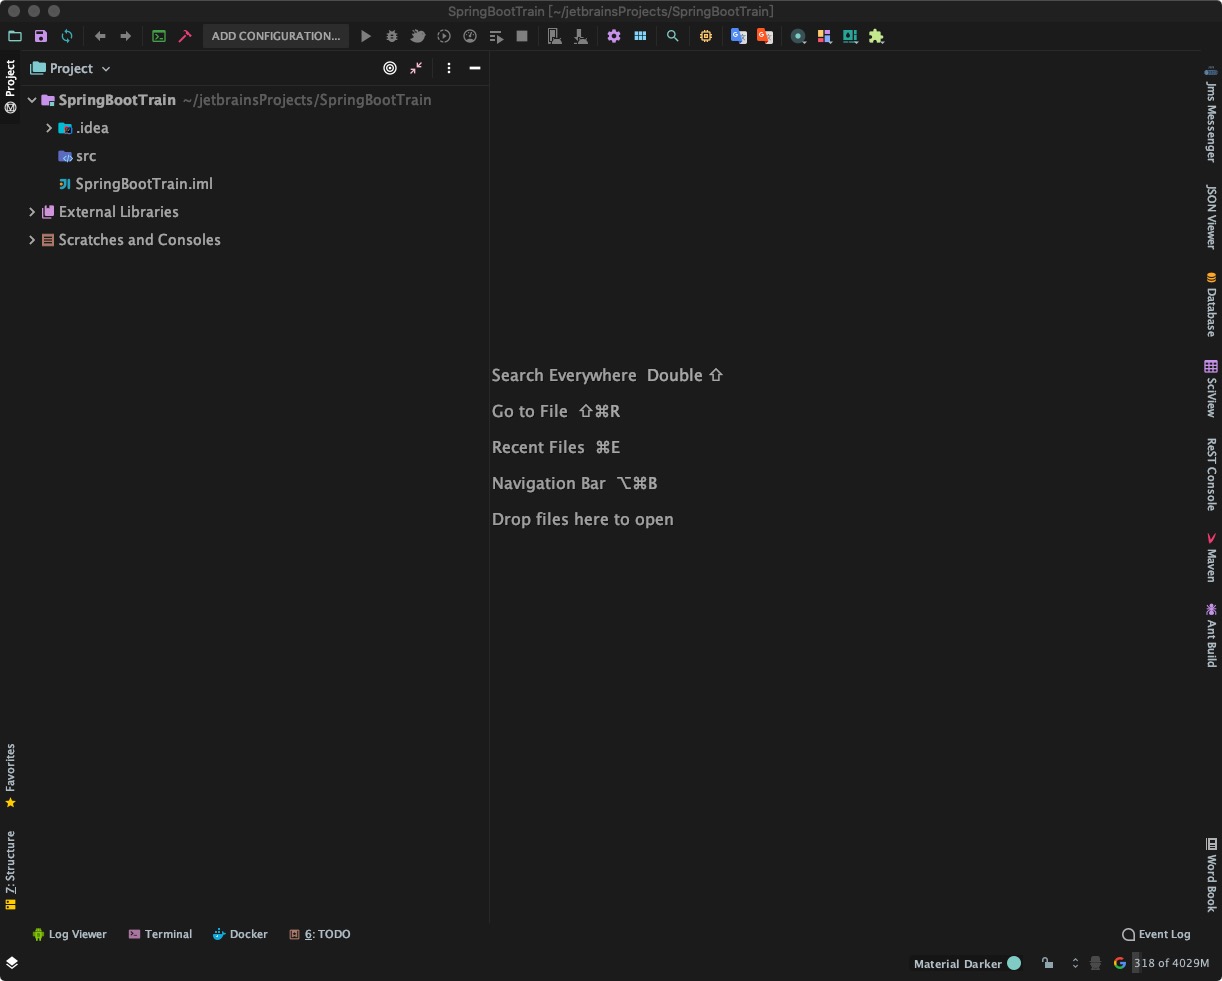
使用
IDEA创建一个名为SpringBootTrain的项目Project(项目):项目工程工作空间,相当于Eclipse中的Workspace(工作空间)- Step 1:
![]()
- Step 2:
![]()
- Step 3:
![]()
- Step 4:
![]()
- Step 5:
![]()
- Step 1:
-
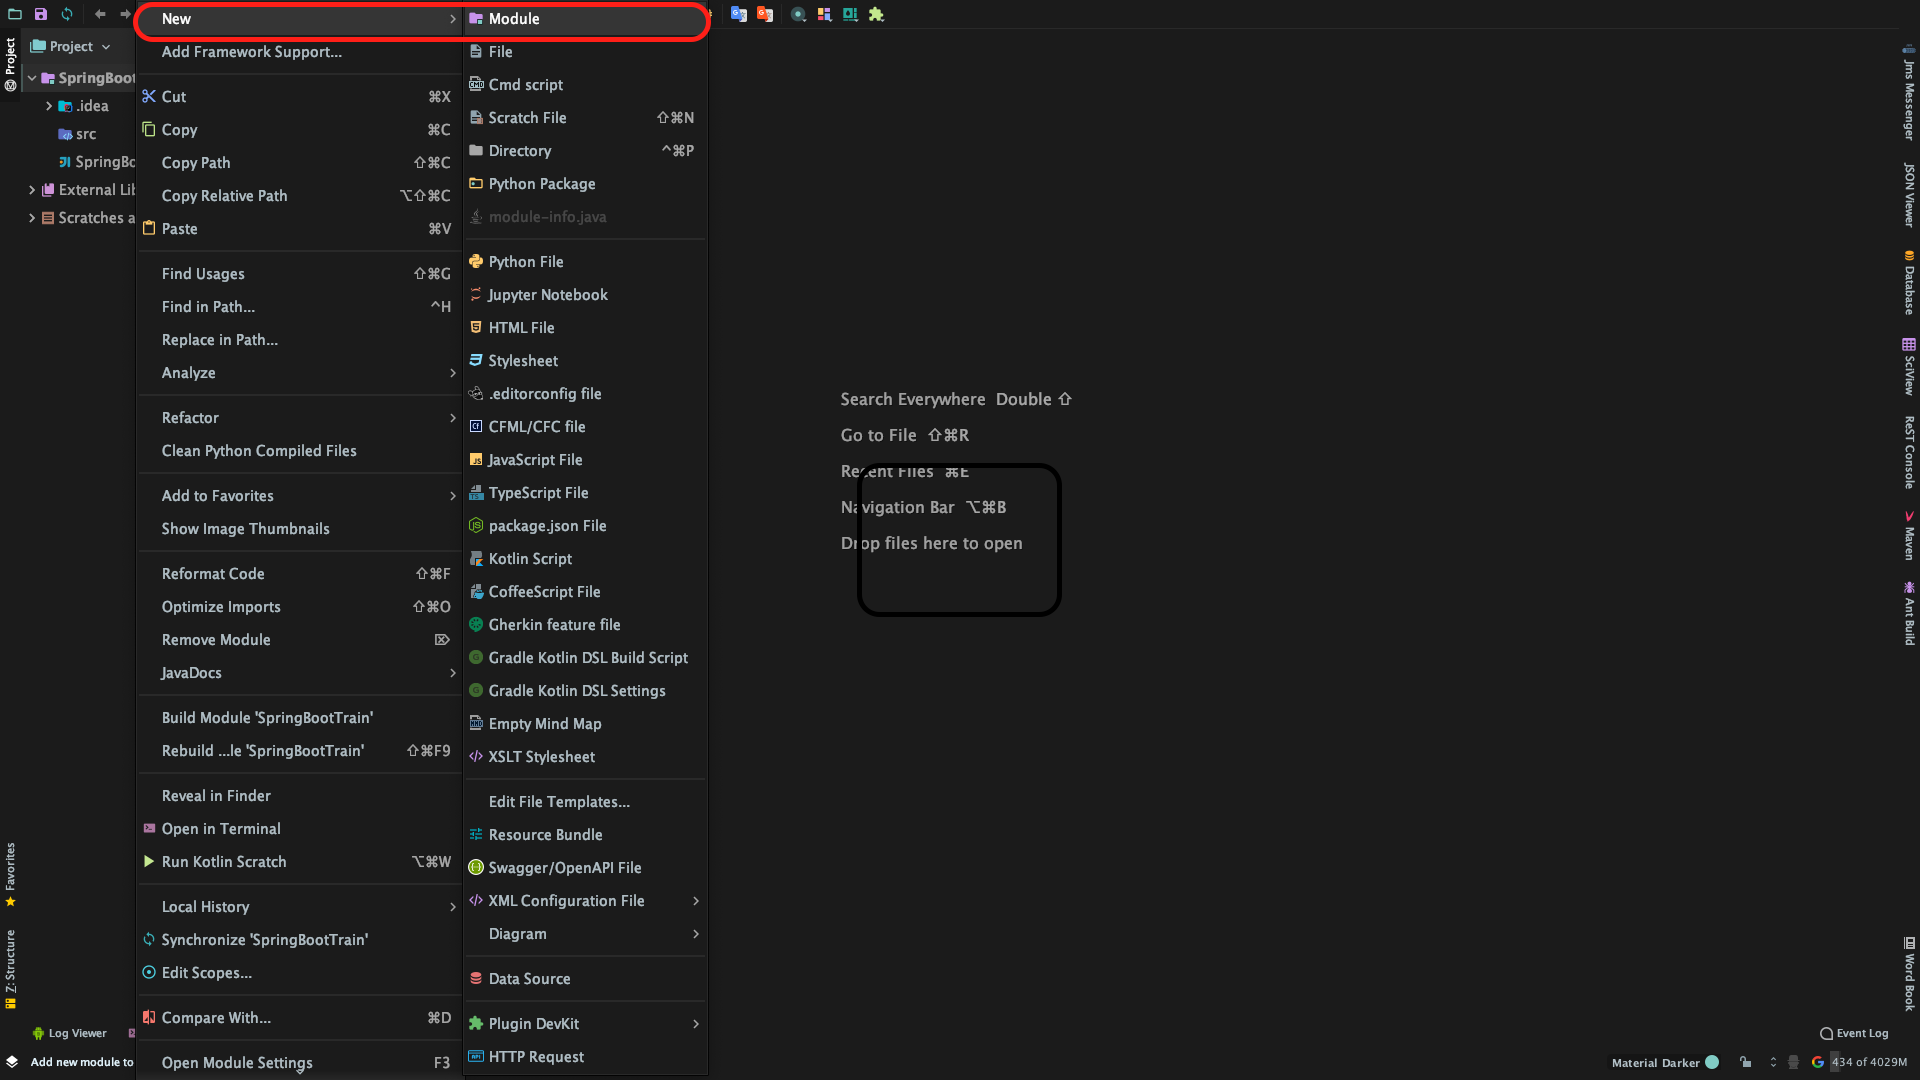
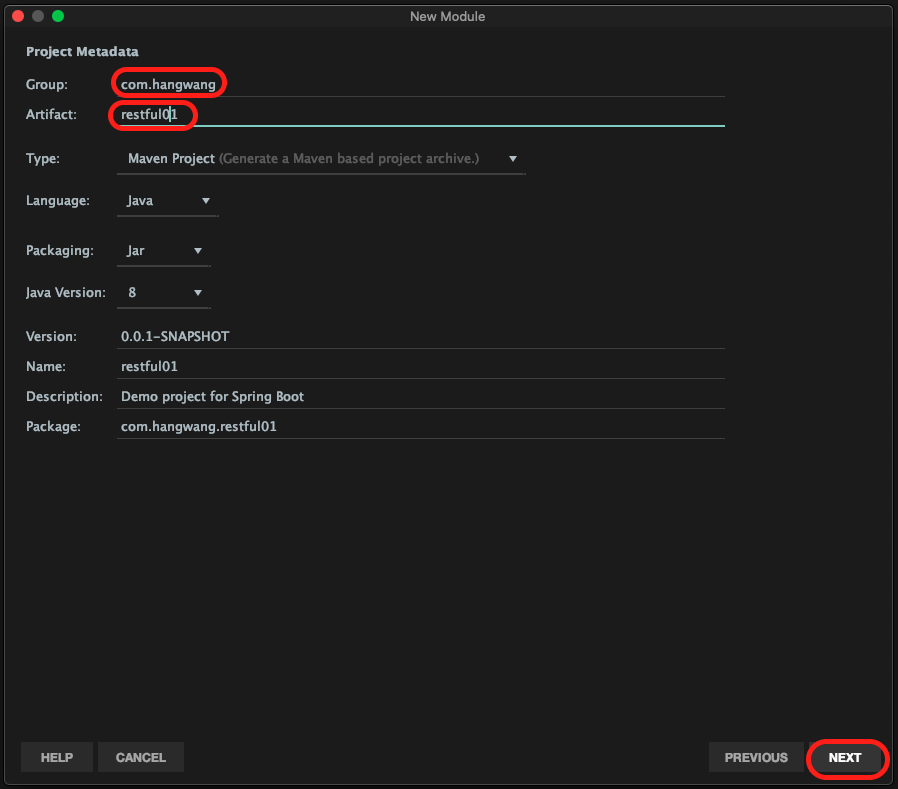
在刚刚创建的
Project中创建Module(模块)Module(模块):Eclipse中Project相当于IDEA中的Module-
Step 1:
![]()
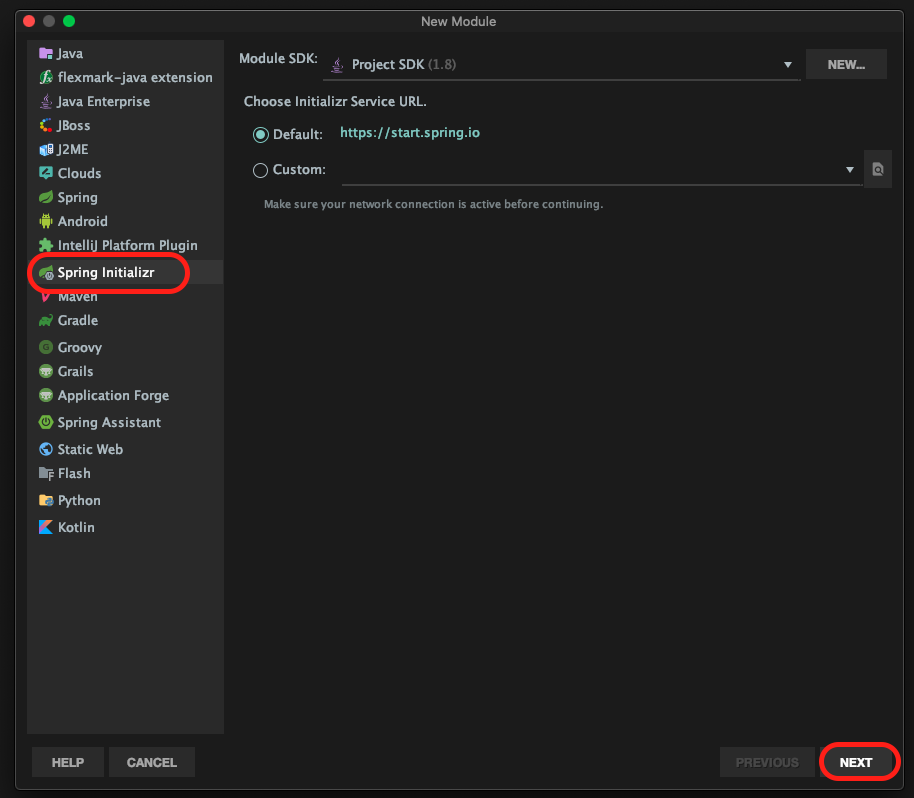
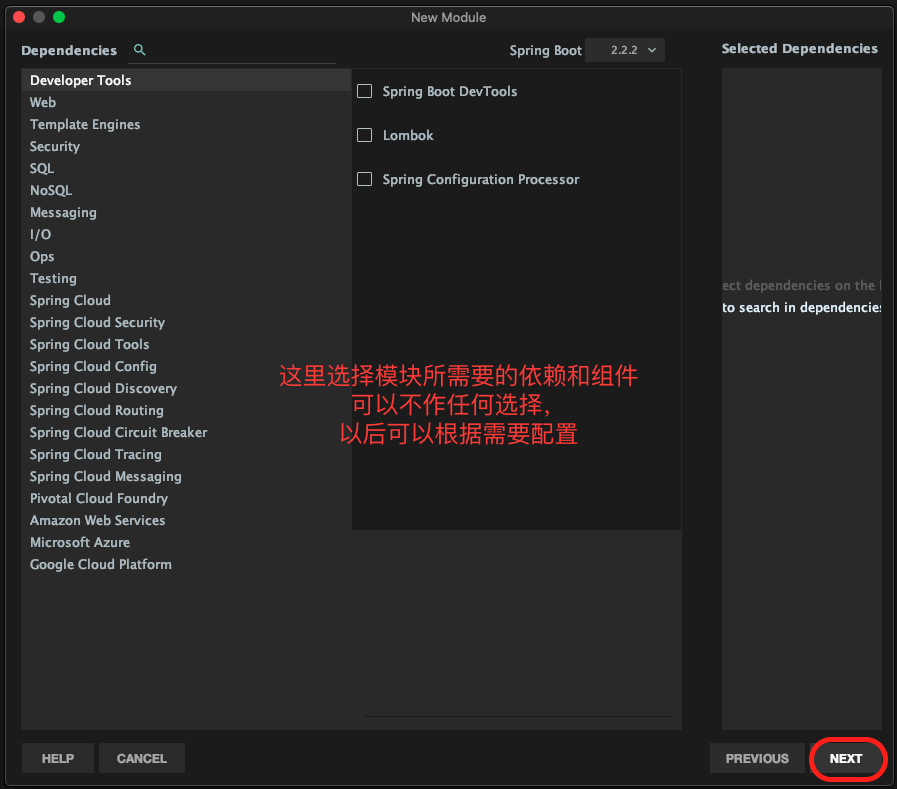
-
Step 2:
![]()
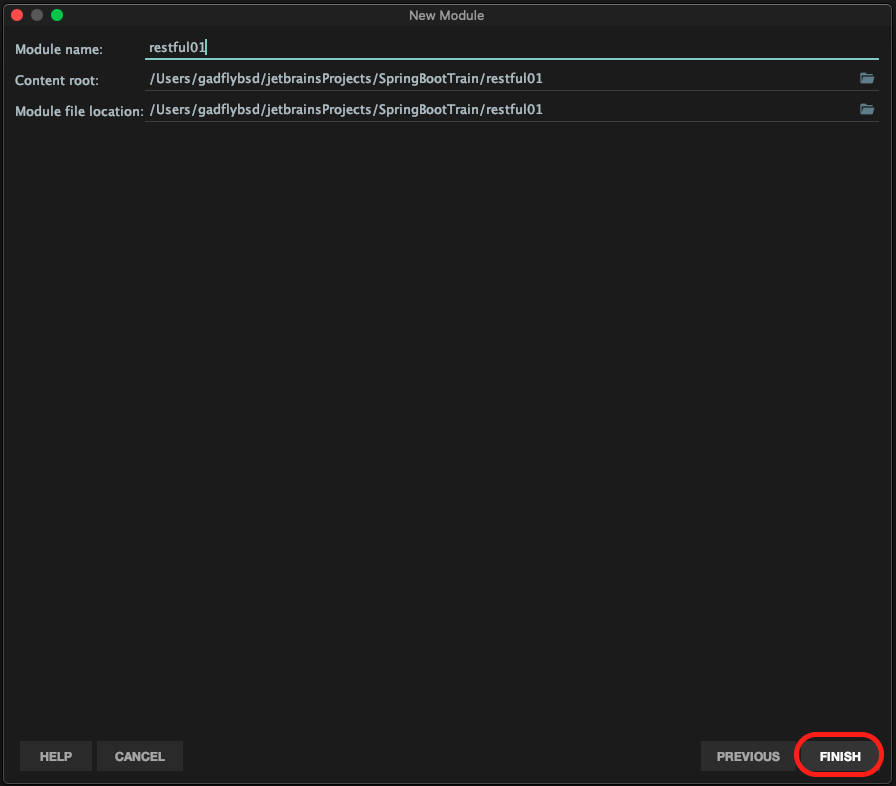
-
Step 3:
![]()
-
Step 4:
![]()
-
Step 5:
![]()
-
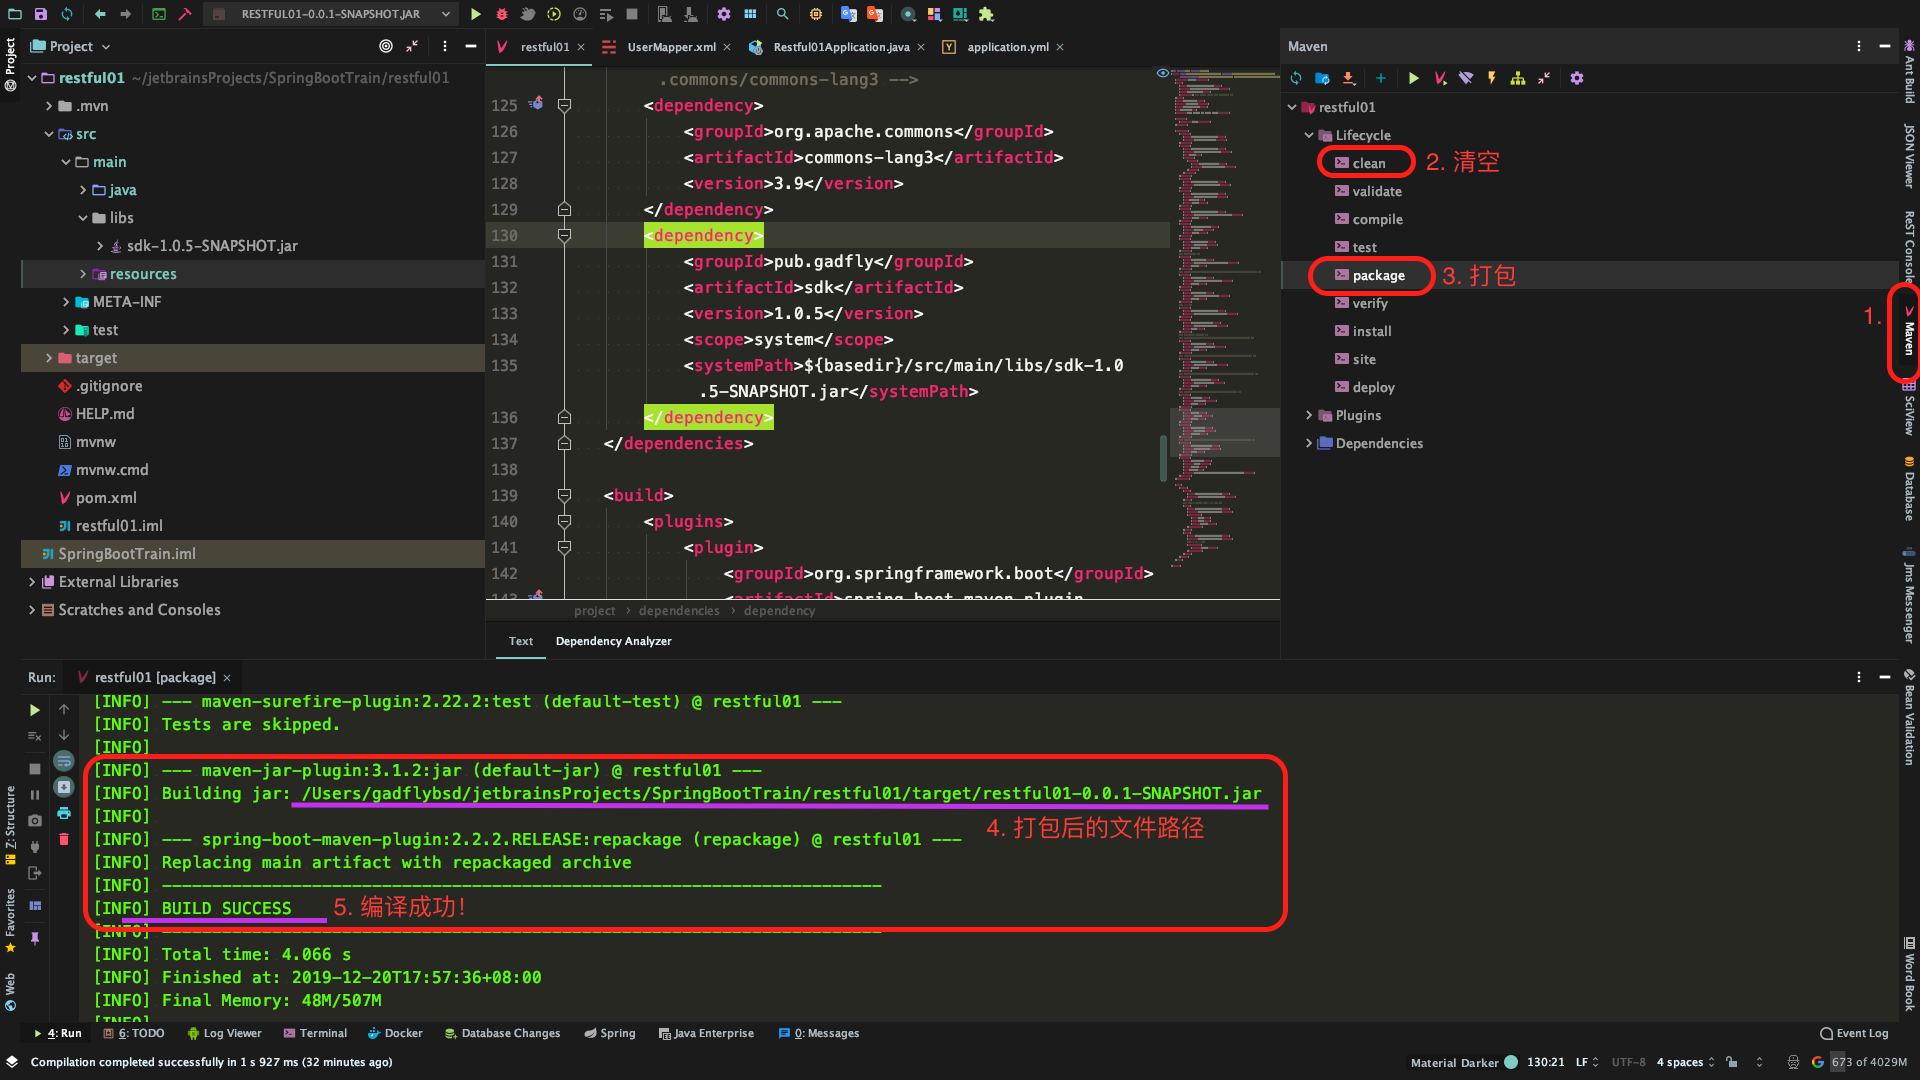
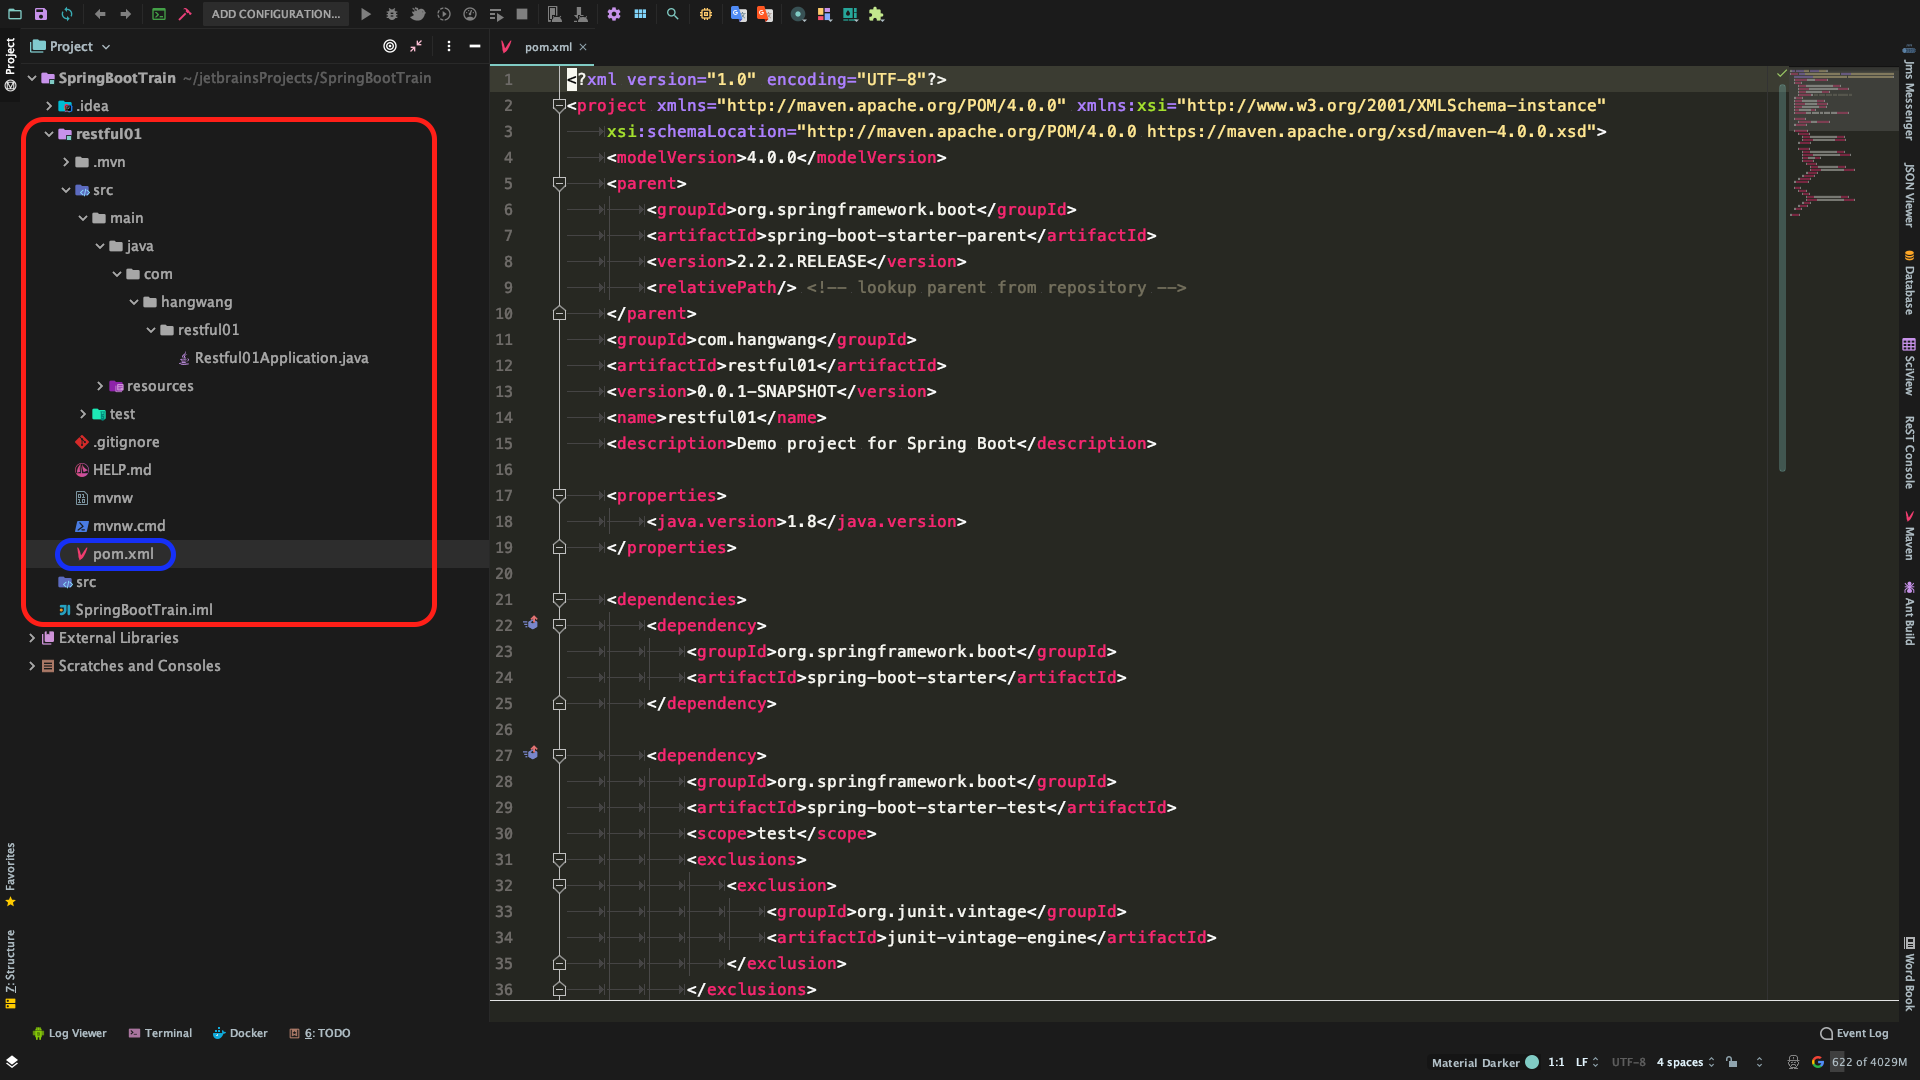
Step 6:打开新创建的
Restful01模块中的pom.xml文件手动配置组件和依赖包
![]()
-
-
配置组件和依赖包
-
在
<dependencies><\dependencies>中添加需要的组件和依赖包<dependency>
<groupId>org.springframework.boot</groupId>
<artifactId>spring-boot-starter-web</artifactId>
</dependency>
<dependency>
<groupId>org.springframework.boot</groupId>
<artifactId>spring-boot-devtools</artifactId>
<scope>runtime</scope>
<optional>true</optional>
</dependency>
<dependency>
<groupId>org.springframework.boot</groupId>
<artifactId>spring-boot-configuration-processor</artifactId>
<optional>true</optional>
</dependency>
<dependency>
<groupId>org.projectlombok</groupId>
<artifactId>lombok</artifactId>
<optional>true</optional>
</dependency>
<dependency>
<groupId>org.postgresql</groupId>
<artifactId>postgresql</artifactId>
<version>42.2.8</version>
</dependency>
<!-- mybatis-plus -->
<dependency>
<groupId>com.baomidou</groupId>
<artifactId>mybatisplus-spring-boot-starter</artifactId>
<version>1.0.5</version>
</dependency>
<!-- https://mvnrepository.com/artifact/com.baomidou/mybatis-plus-boot-starter -->
<dependency>
<groupId>com.baomidou</groupId>
<artifactId>mybatis-plus-boot-starter</artifactId>
<version>3.1.2</version>
</dependency>
<dependency>
<groupId>com.baomidou</groupId>
<artifactId>mybatis-plus-generator</artifactId>
<version>3.1.2</version>
</dependency>
<!-- 模版引擎 -->
<dependency>
<groupId>org.springframework.boot</groupId>
<artifactId>spring-boot-starter-freemarker</artifactId>
</dependency>
<dependency>
<groupId>org.apache.velocity</groupId>
<artifactId>velocity-engine-core</artifactId>
<version>2.0</version>
</dependency>
<!-- SpringBoot整合Swagger2 -->
<!-- https://mvnrepository.com/artifact/io.springfox/springfox-swagger2 -->
<dependency>
<groupId>io.springfox</groupId>
<artifactId>springfox-swagger2</artifactId>
<version>2.9.2</version>
</dependency>
<!-- https://mvnrepository.com/artifact/io.springfox/springfox-swagger-ui -->
<dependency>
<groupId>io.springfox</groupId>
<artifactId>springfox-swagger-ui</artifactId>
<version>2.9.2</version>
</dependency>
<!-- https://mvnrepository.com/artifact/commons-beanutils/commons-beanutils -->
<dependency>
<groupId>commons-beanutils</groupId>
<artifactId>commons-beanutils</artifactId>
<version>1.9.4</version>
</dependency>
<!-- https://mvnrepository.com/artifact/org.yaml/snakeyaml -->
<dependency>
<groupId>org.yaml</groupId>
<artifactId>snakeyaml</artifactId>
<version>1.25</version>
</dependency>
<dependency>
<groupId>junit</groupId>
<artifactId>junit</artifactId>
<version>4.12</version>
</dependency>
<dependency>
<groupId>com.alibaba</groupId>
<artifactId>fastjson</artifactId>
<version>1.2.58</version>
</dependency>
<!-- https://mvnrepository.com/artifact/org.apache.commons/commons-lang3 -->
<dependency>
<groupId>org.apache.commons</groupId>
<artifactId>commons-lang3</artifactId>
<version>3.9</version>
</dependency> -
在
<plugins><\plugins>中添加如下内容,指定打包方式<!-- java编译插件,maven默认1.5版本过低,指定为1.8 -->
<plugin>
<groupId>org.apache.maven.plugins</groupId>
<artifactId>maven-compiler-plugin</artifactId>
<configuration>
<source>1.8</source>
<target>1.8</target>
<encoding>UTF-8</encoding>
</configuration>
</plugin>
<plugin>
<groupId>org.apache.maven.plugins</groupId>
<artifactId>maven-surefire-plugin</artifactId>
<!--编译打包时,忽略测试类-->
<configuration>
<skipTests>true</skipTests>
</configuration>
</plugin>
-
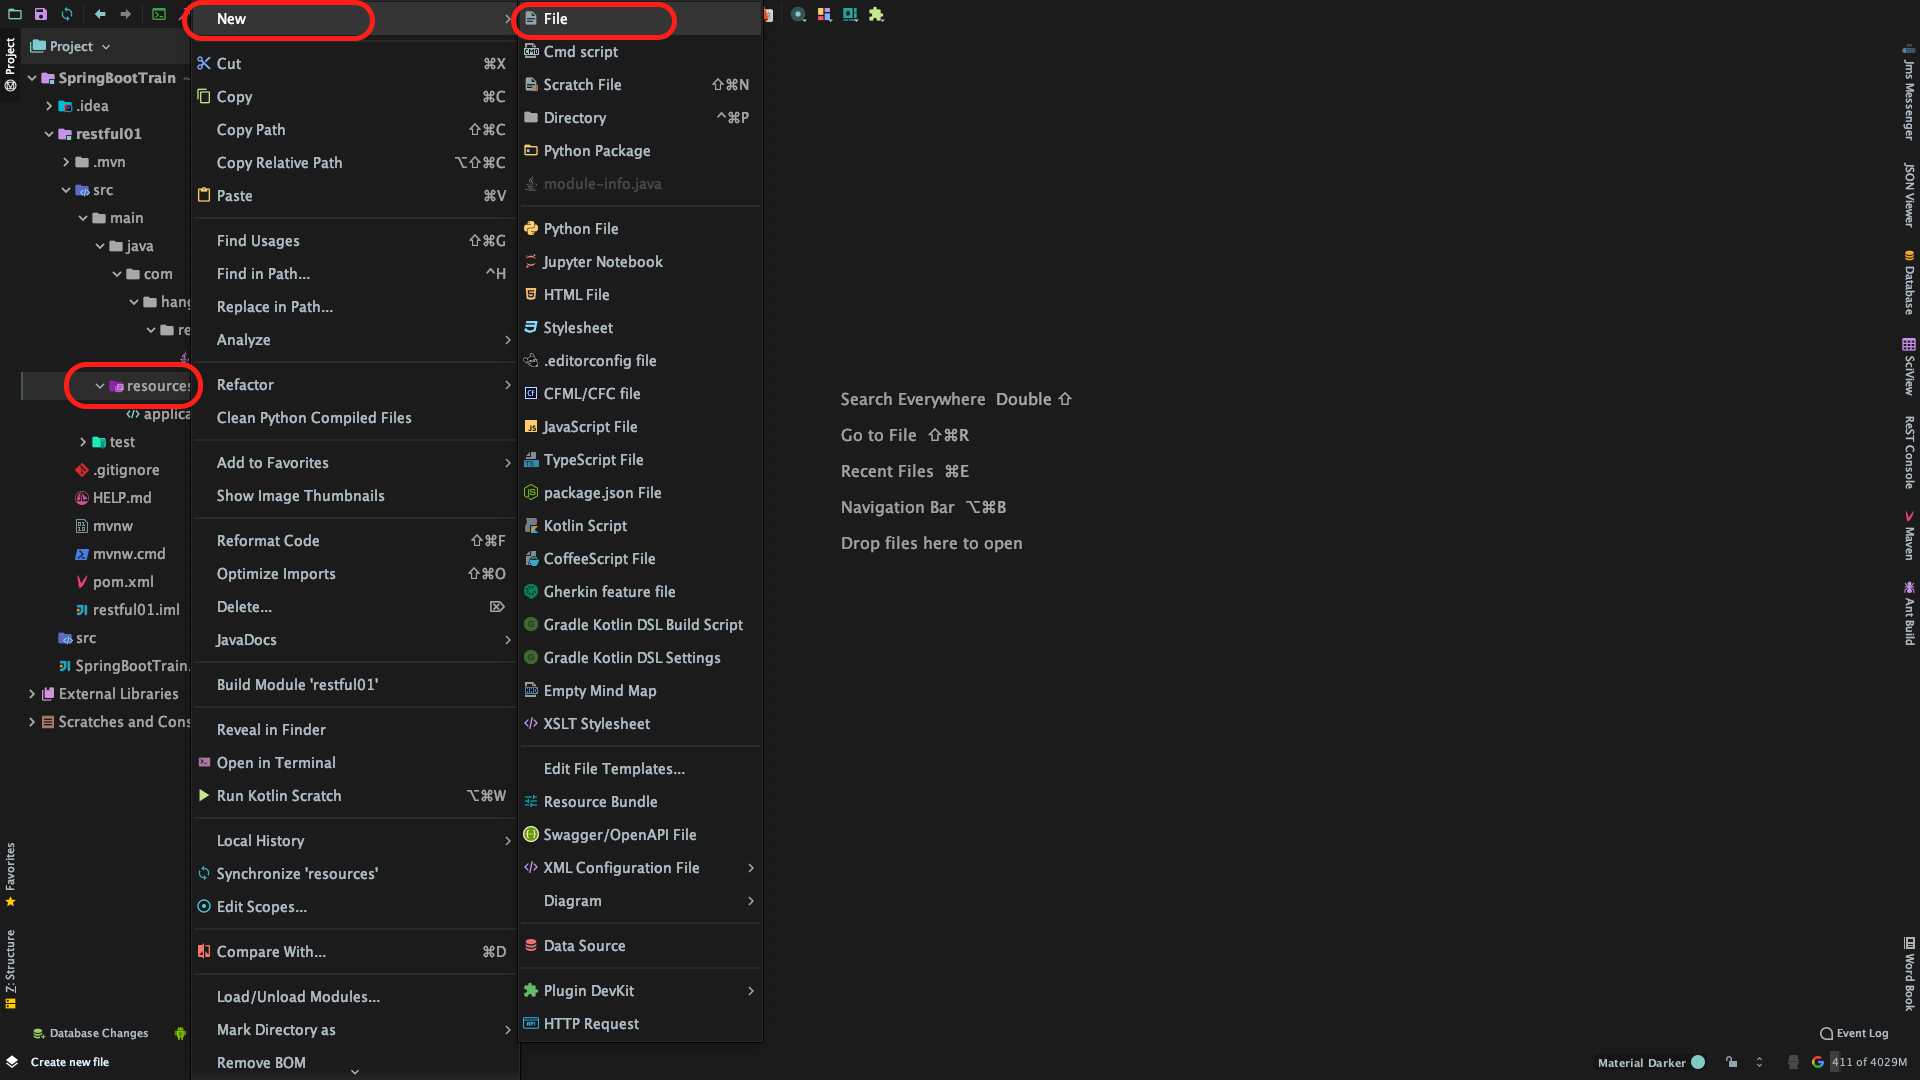
新建模块
application.yml配置文件并配置SpringBoot-
新建模块
application.yml配置文件- Step 1:
![]()
- Step 2:
![]()
- Step 1:
-
配置
SpringBootserver:
port: 8088
servlet:
context-path: /api #项目名称
swagger:
print-init: true #非必需,默认false
enabled: true #必需
spring:
profiles:
active: local #@spring.active@ #默认使用本地配置文件
datasource:
driver-class-name: org.postgresql.Driver
url: jdbc:postgresql://120.79.90.37:5432/learning
username: learning
password: **************
db-name: learning
db-schema: swagger2
mybatis-plus:
mapper-locations: classpath:/com/hanwang/restful01/mapper/xml/*Mapper.xml
#实体扫描,多个package用逗号或者分号分隔
typeAliasesPackage: com.hanwang.restful01.entity
typeEnumsPackage: com.baomidou.springboot.db.entity.enums
global-config:
#刷新mapper 调试神器
db-config:
#主键类型 0:"数据库ID自增", 1:"用户输入ID",2:"全局唯一ID (数字类型唯一ID)", 3:"全局唯一ID UUID";
id-type: uuid
#字段策略 0:"忽略判断",1:"非 NULL 判断"),2:"非空判断"
field-strategy: not_empty
#驼峰下划线转换
column-underline: true
#数据库大写下划线转换
#capital-mode: true
#逻辑删除配置
logic-delete-value: Y
logic-not-delete-value: N
db-type: pgsql
refresh: true
sql-injector: com.baomidou.mybatisplus.extension.injector.LogicSqlInjector
#自定义填充策略接口实现
#meta-object-Handler: com.baomidou.springboot.xxx
#自定义SQL注入器
#sql-injector: com.baomidou.springboot.xxx
configuration:
map-underscore-to-camel-case: true
cache-enabled: false
generator:
module-name: restful01
author: gadfly
file-override: true
#logging
logging:
path: maven-logs
level:
root: warn
-
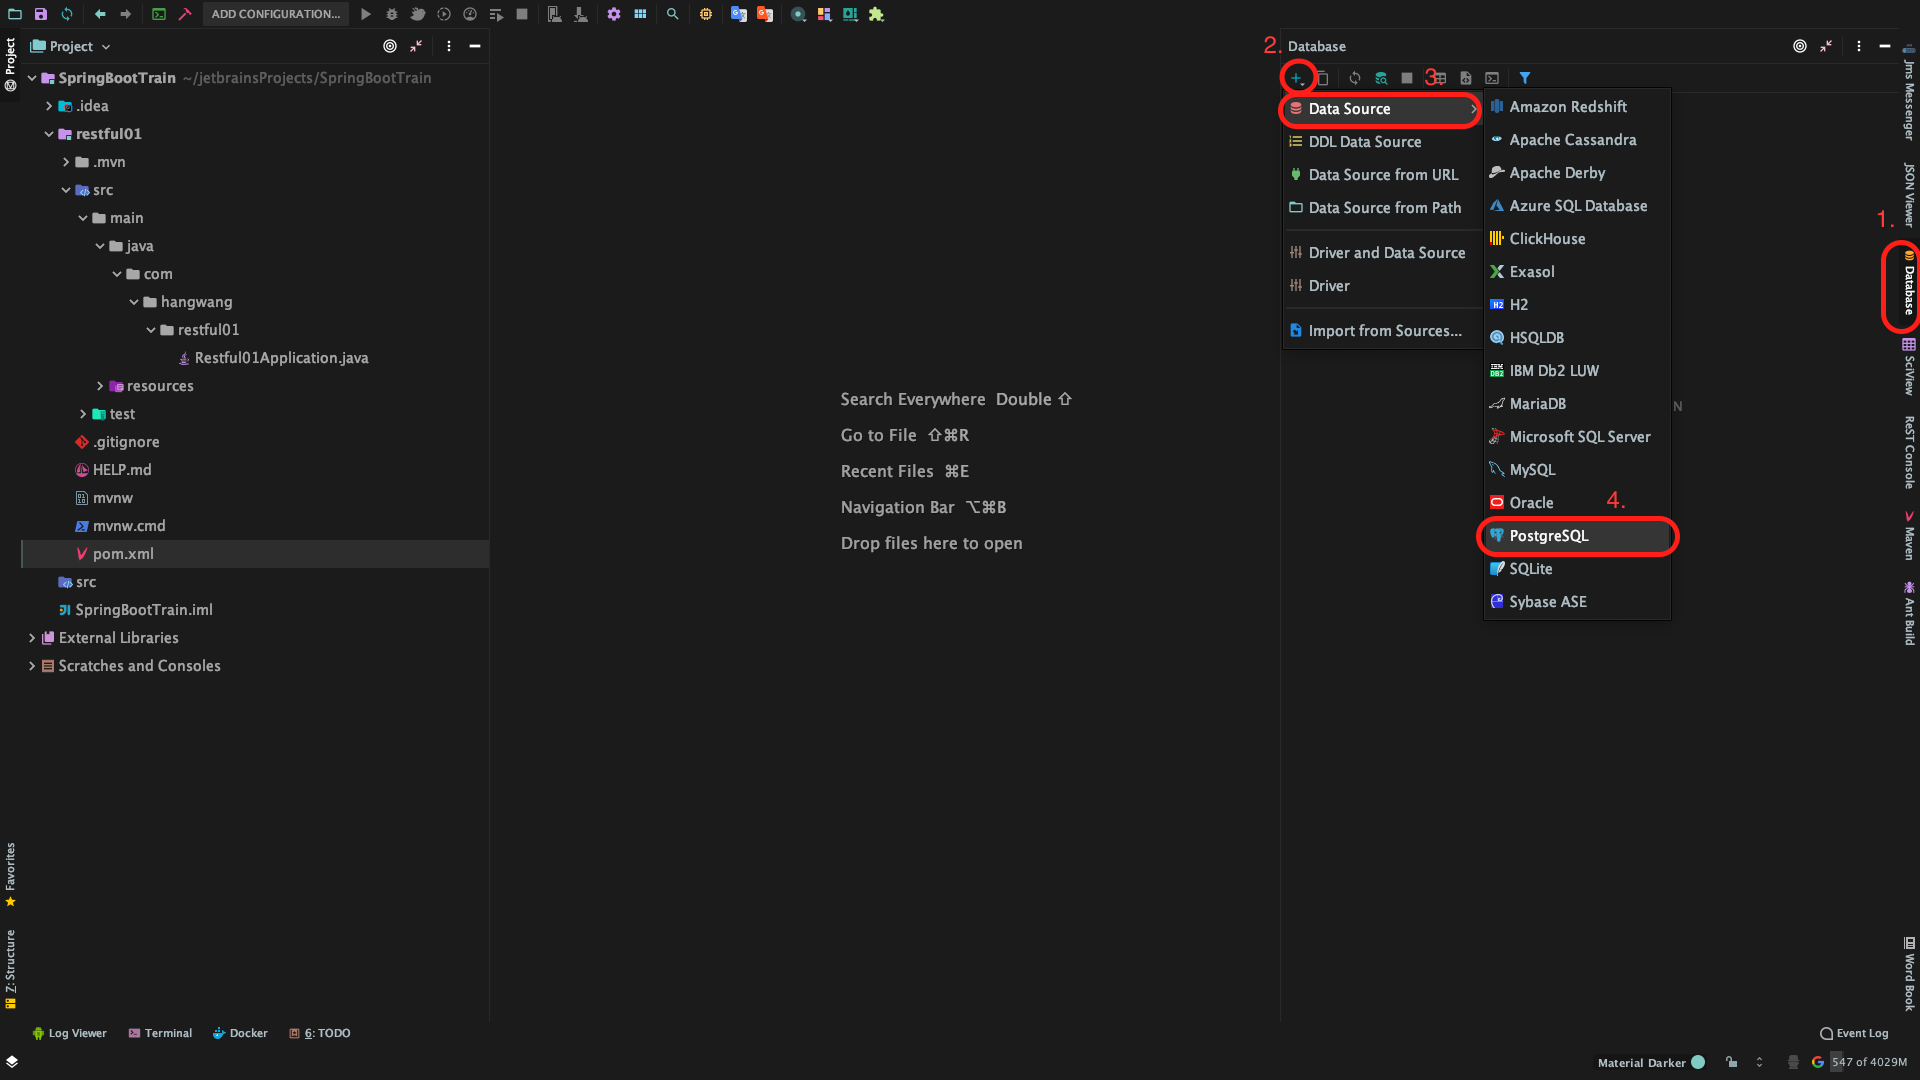
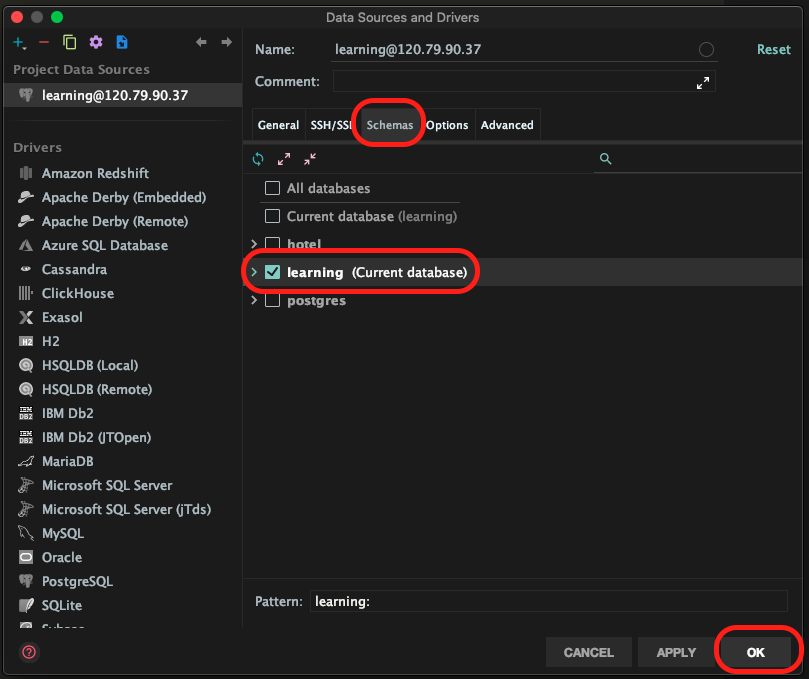
-
配置
IDEA的数据库可视化发开组件 -
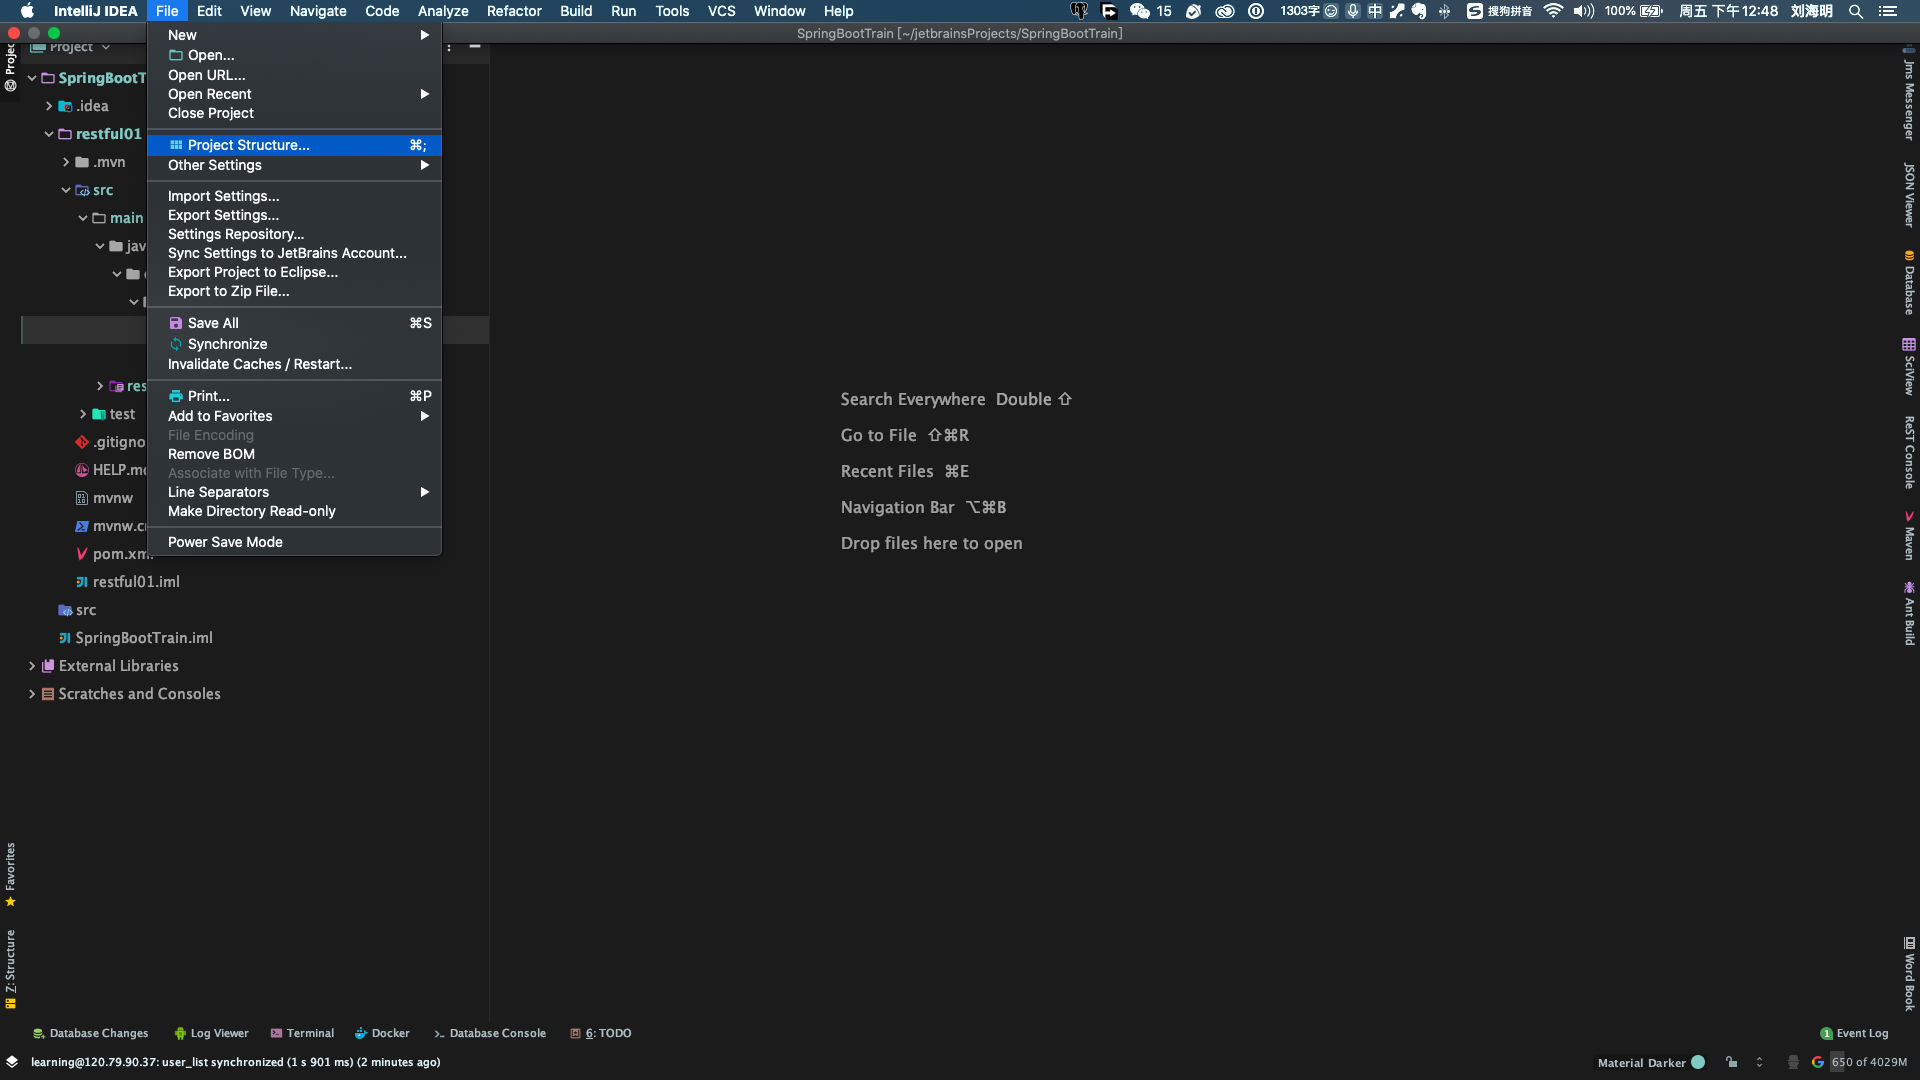
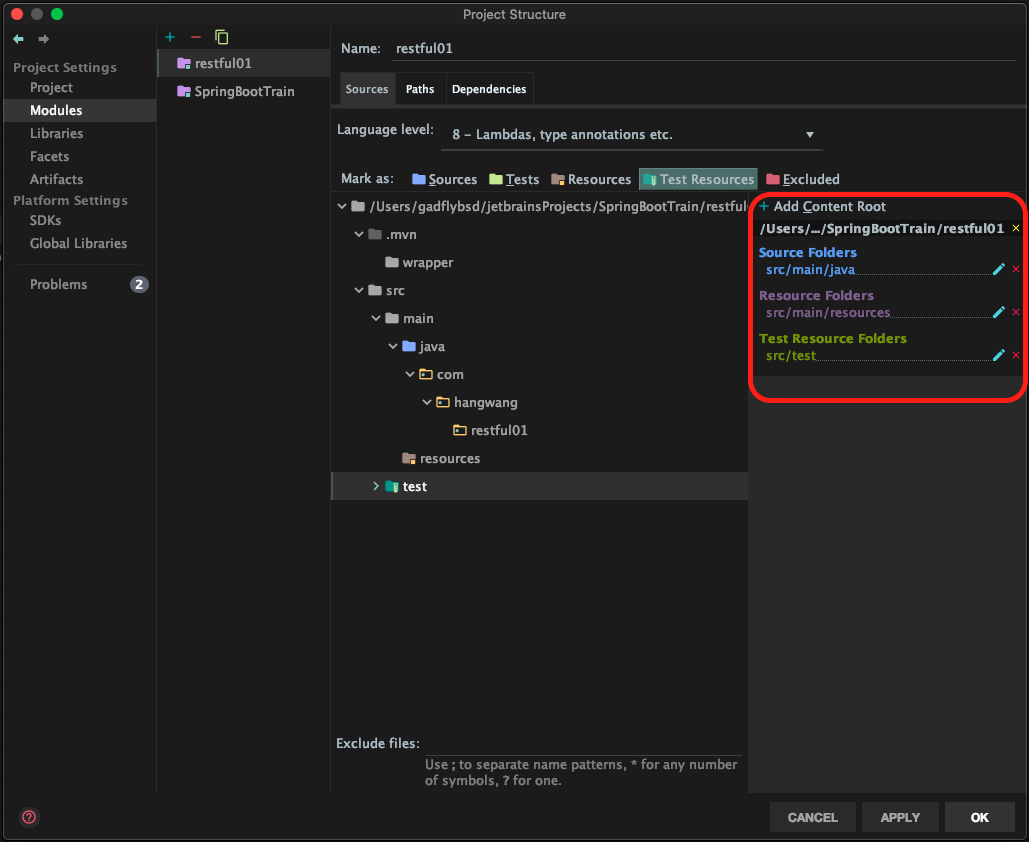
配置
Project Structure项目结构对
module的开发目录进行文件夹分类,以让idea明白怎么去对待他们,明确哪些是存放源代码的文件夹,哪些是存放静态文件的文件夹,哪些是存放测试代码的文件夹,哪些是被排除编译的文件夹。Sources:源代码存放的文件,蓝色。Tests:设置测试代码存放的文件件,绿色。Resources:一般对应着Sources文件,一般放配置文件,如:log4j.properties,application.yml。Test Resources:这个对应着Tests文件夹,存放着Tests代码的配置文件。Excluded:设置配出编译检查的文件,例如我们在project模块设置的out文件夹。
- Step 1:
![]()
- Step 2:
![]()
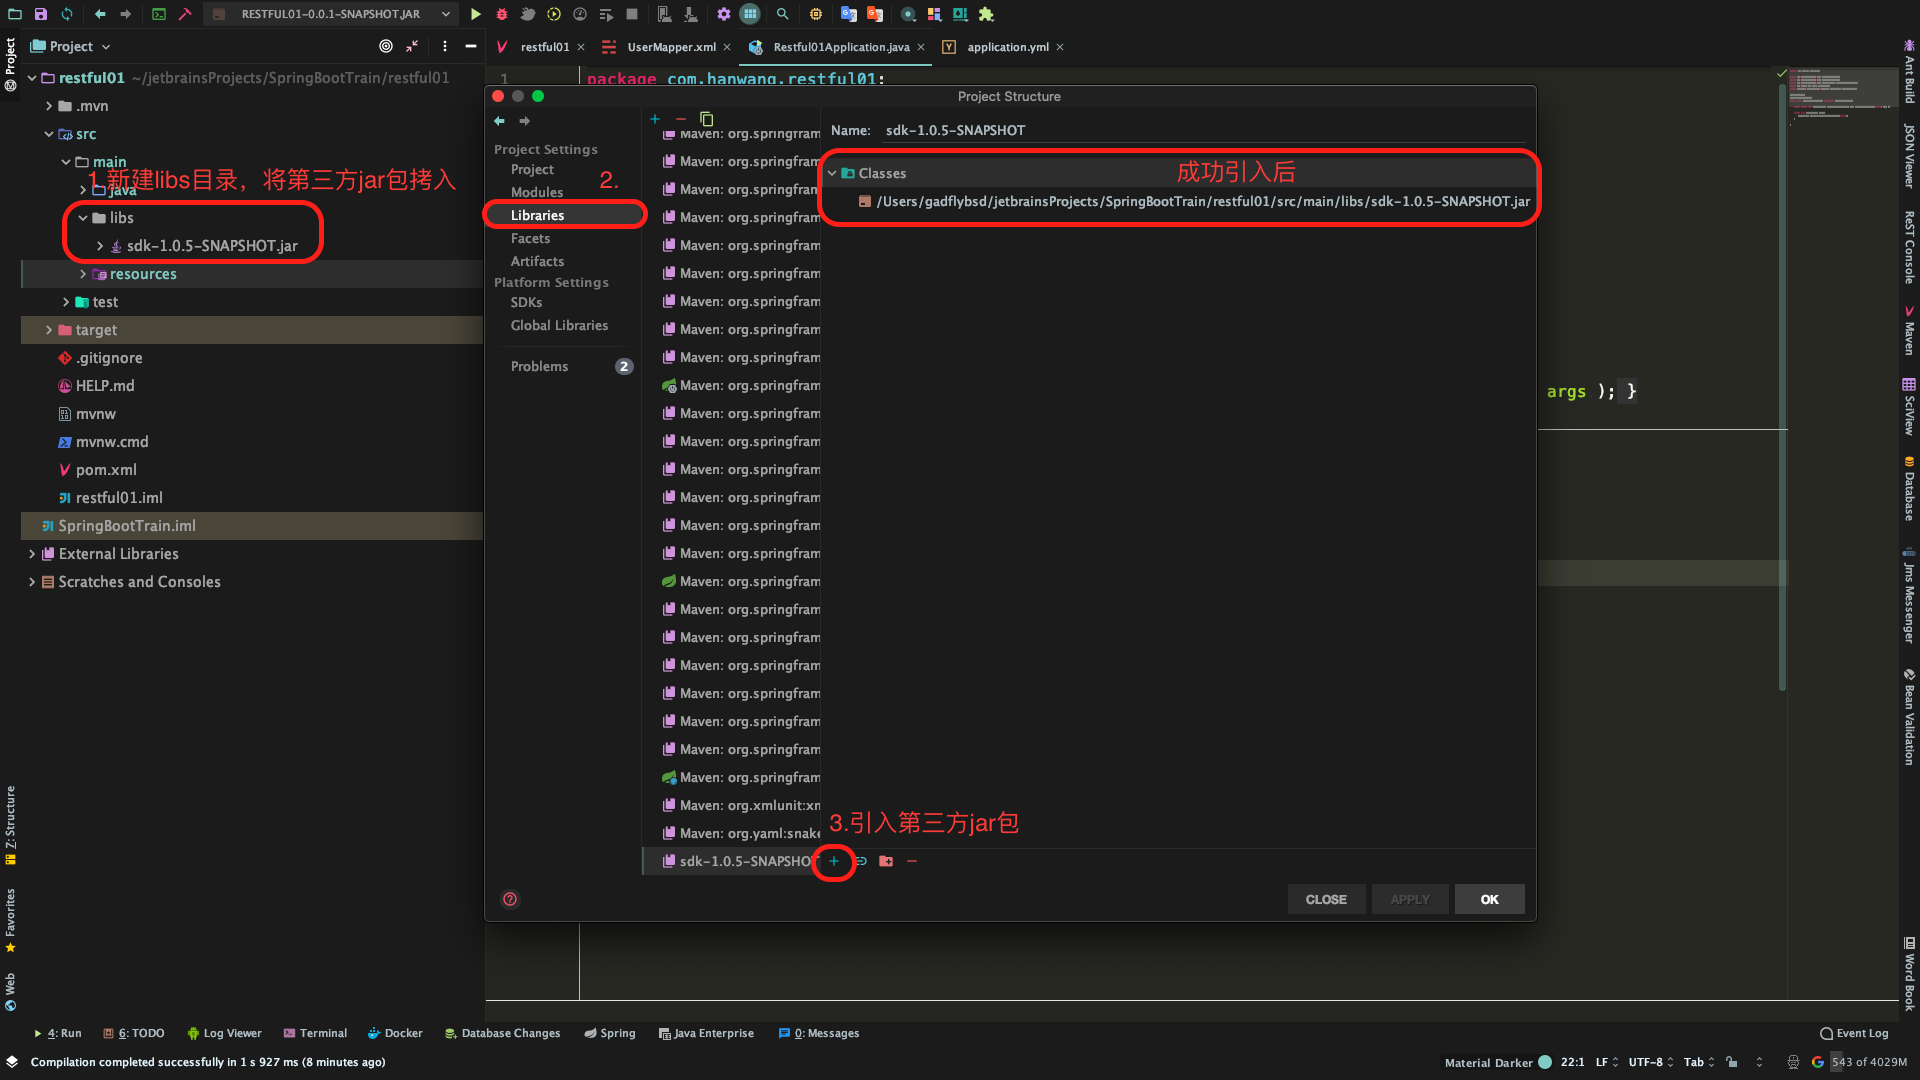
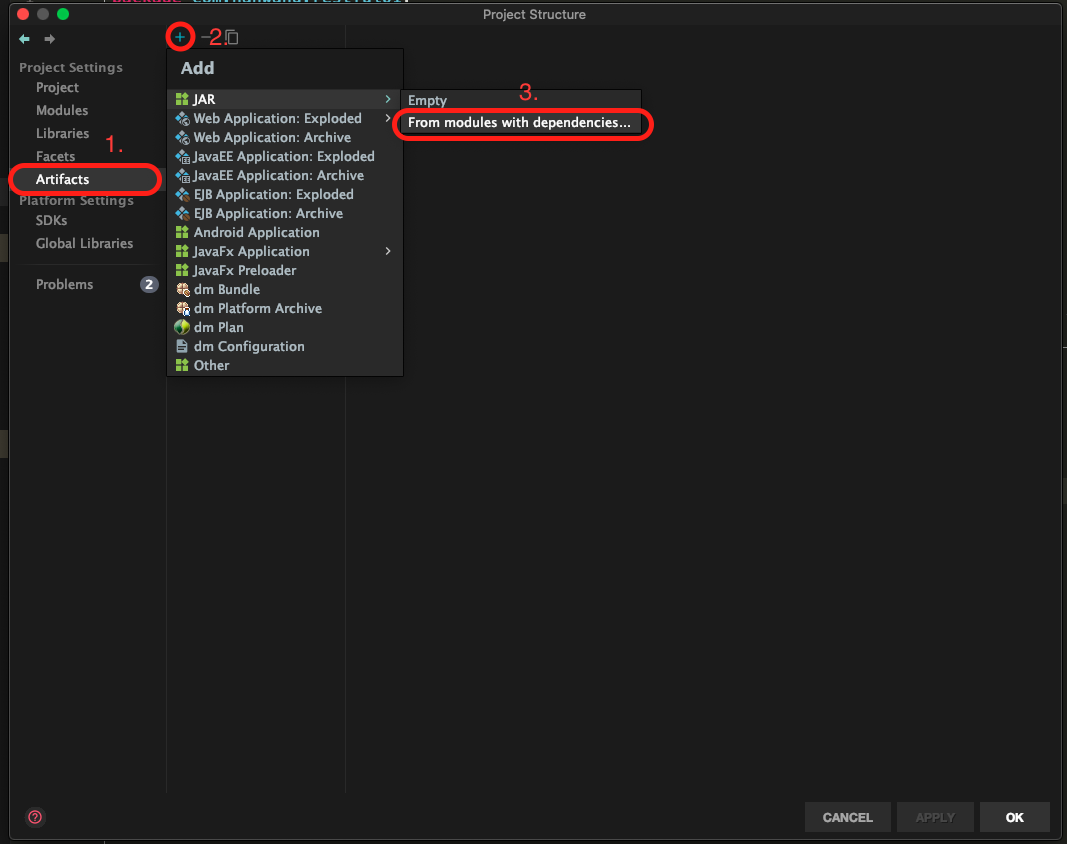
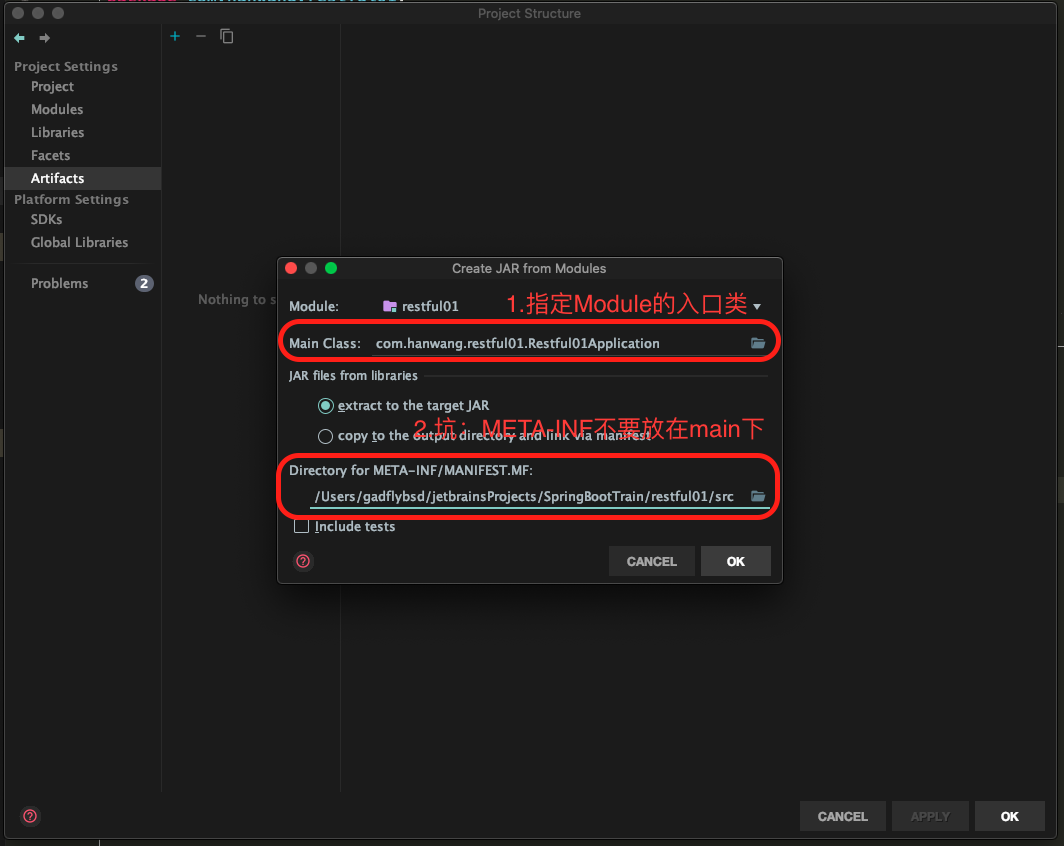
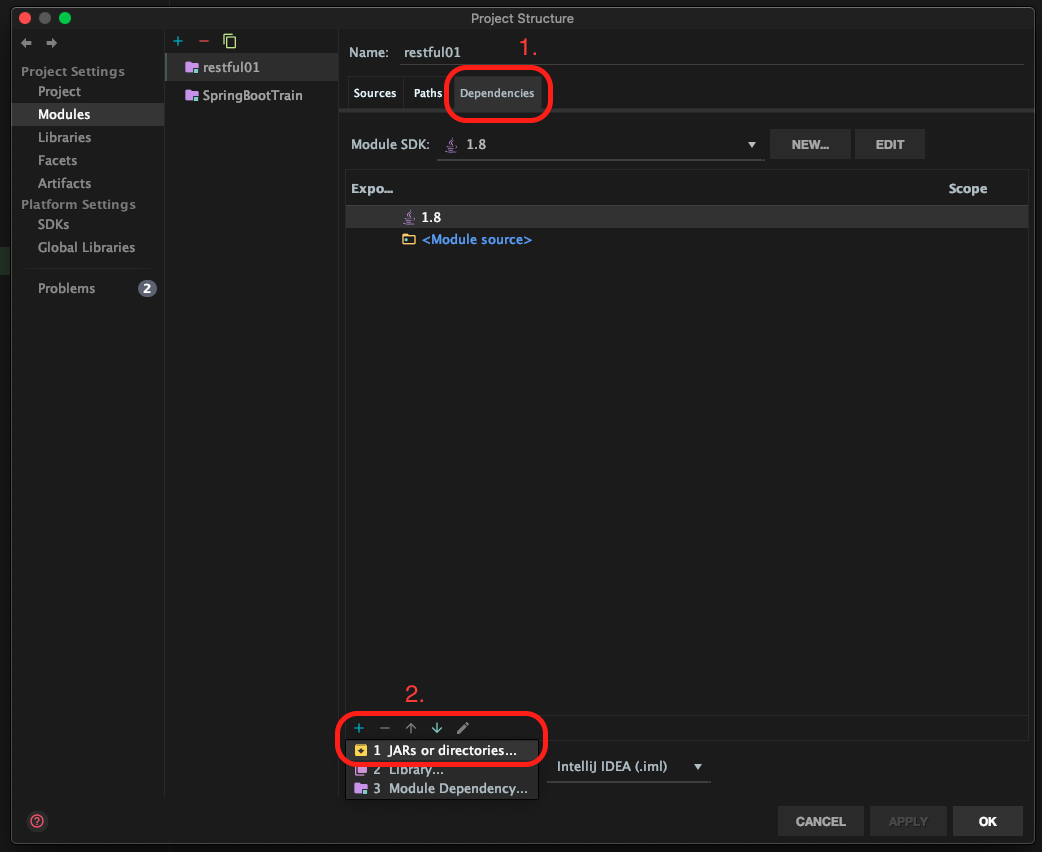
- Step 3:引入项目需要的其他第三方的
SDK(如果有)
![]()
![]()
-
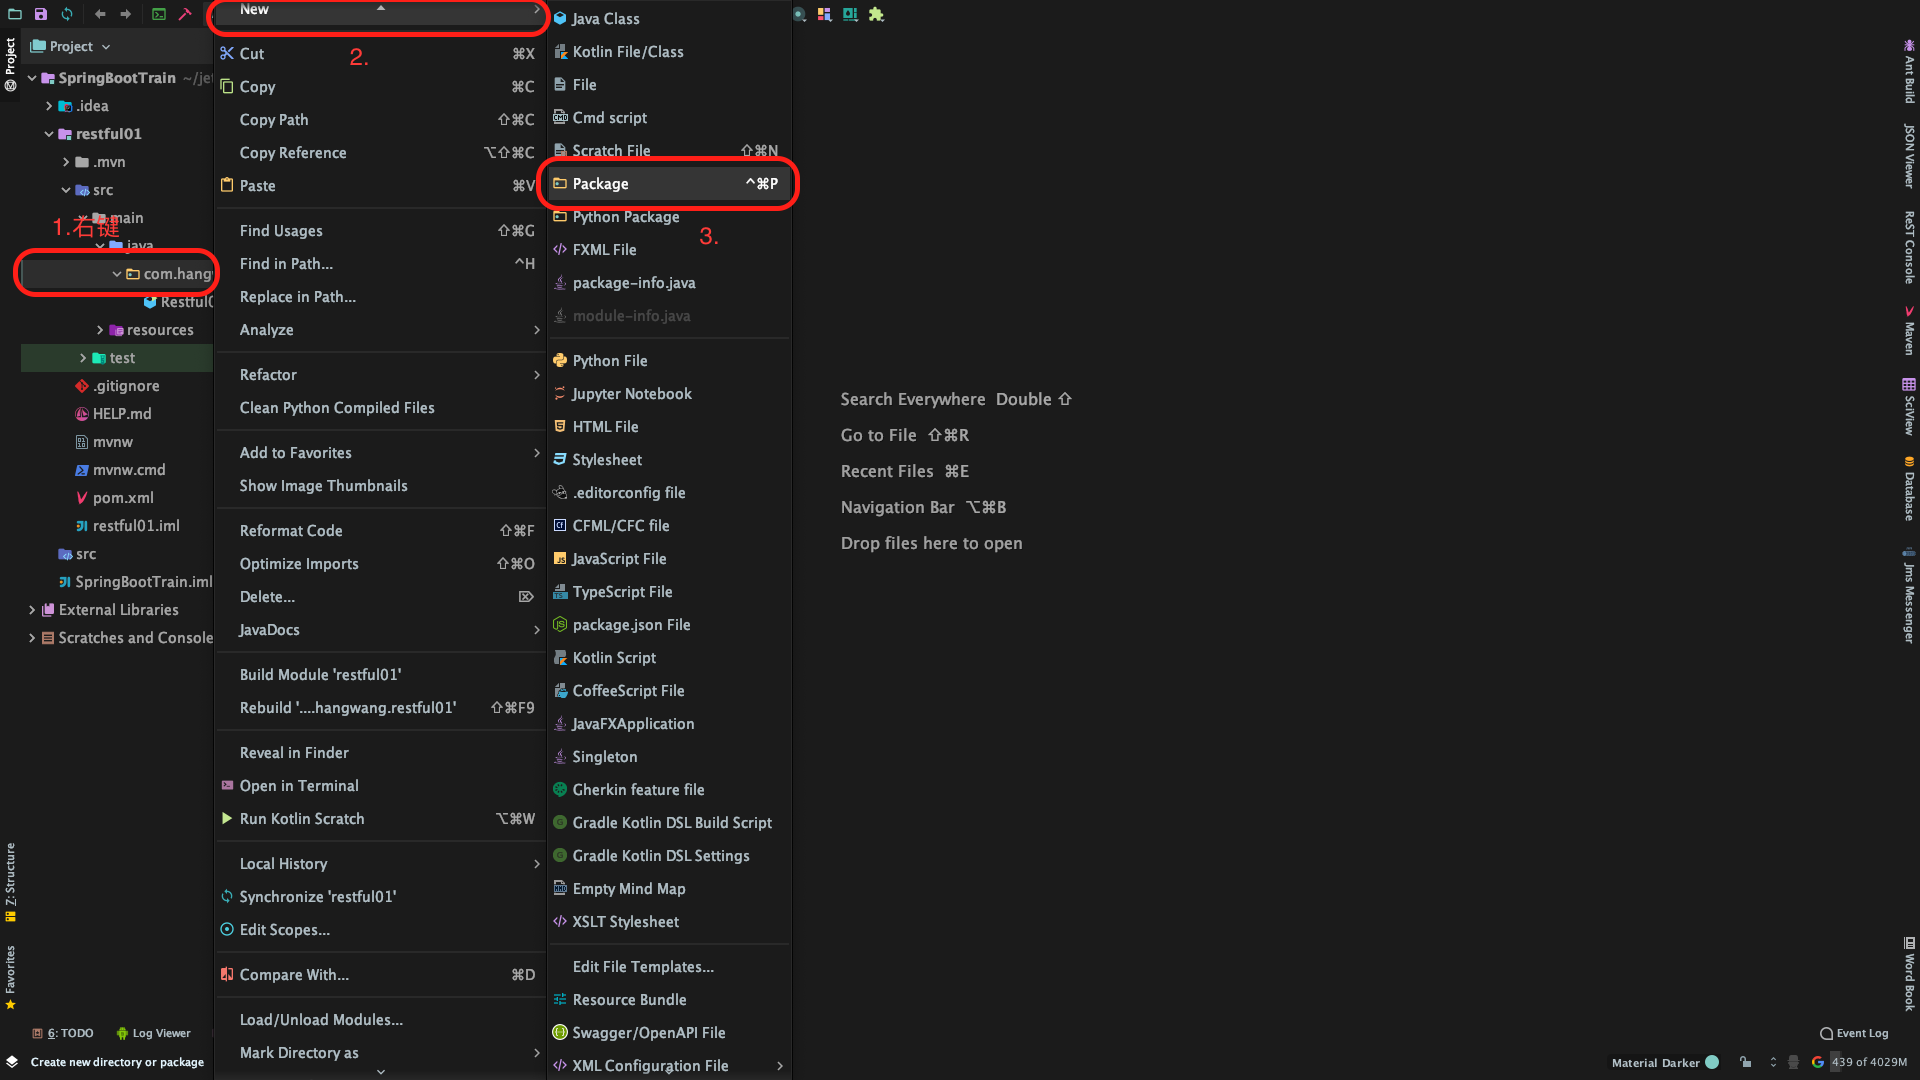
新建
Package包为了更好地组织类,
Java提供了包机制,用于区别类名的命名空间。- configure(配置)
- entity(实体)
entity的意思就是实体的意思,所以也是最常用到的,entity包中的类是必须和数据库相对应的
- model(模型)
model大家不陌生,都知道是模型的意思,当用model当包名的时候,一般里面存的是实体类的模型,一般是用来给前端用的。
- service(服务)
- mapper(数据库映射)
- controller(控制器)


-
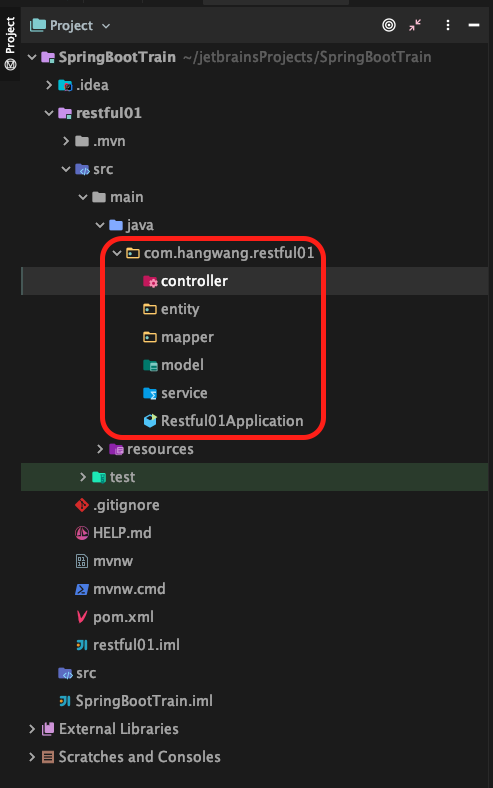
新建
![]()
-
完成
![]()
三、开发编程
在configure包中新建MybatisPlus的配置类MybatisPlusConfigure.class
import com.baomidou.mybatisplus.extension.plugins.PaginationInterceptor; |
在configure包中新建Swagger2的配置类Swagger2Configure.class
import org.springframework.context.annotation.Bean; |
在entity包中新建数据库表user的实体类User.class
import com.baomidou.mybatisplus.annotation.IdType; |
在mapper包中新建数据库表user的数据库映射接口UserMapper.class
import com.hanwang.restful01.entity.User; |
在mapper.xml包中新建数据库表user的实体类UserMapper.xml
|
在service包中新建服务接口UserService.class
import com.baomidou.mybatisplus.core.conditions.Wrapper; |
在service.impl包中新建服务接口的实现类UserServiceImpl.class
import com.baomidou.mybatisplus.core.metadata.IPage; |
在controller包中新建控制器类UserController.class
import org.springframework.web.bind.annotation.*; |
四、测试运行
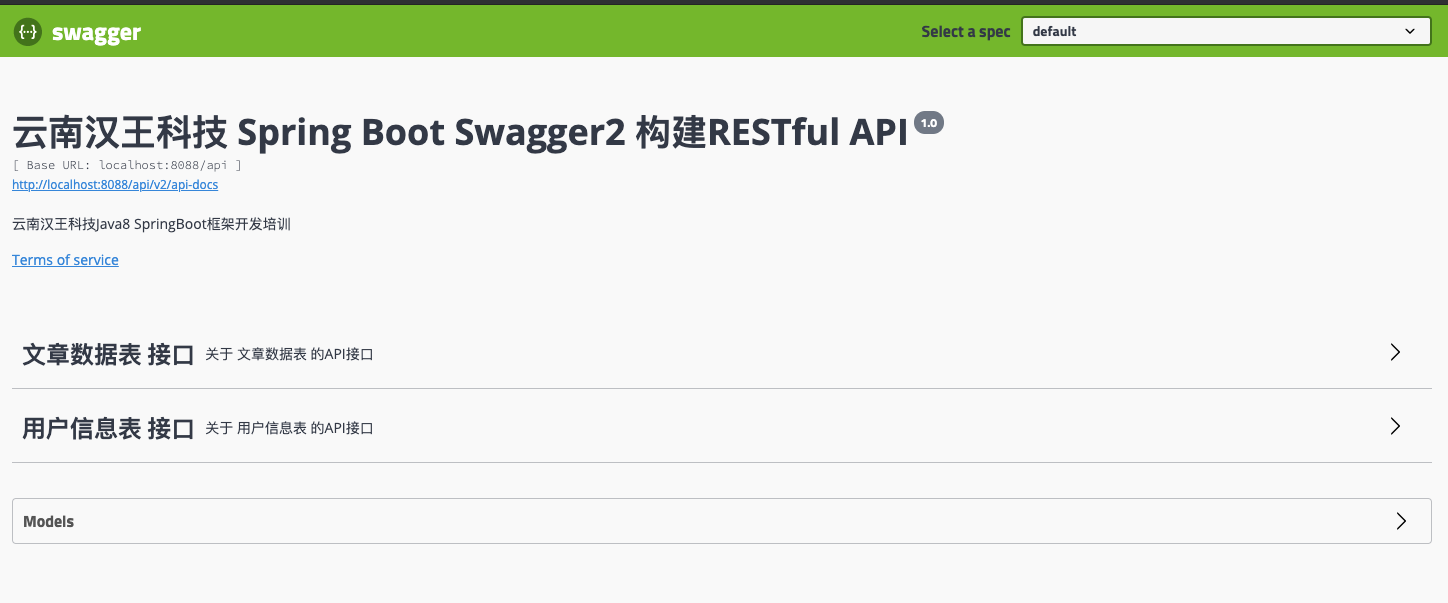
在模块入口文件打开swagger2
@EnableSwagger2
2 |
运行
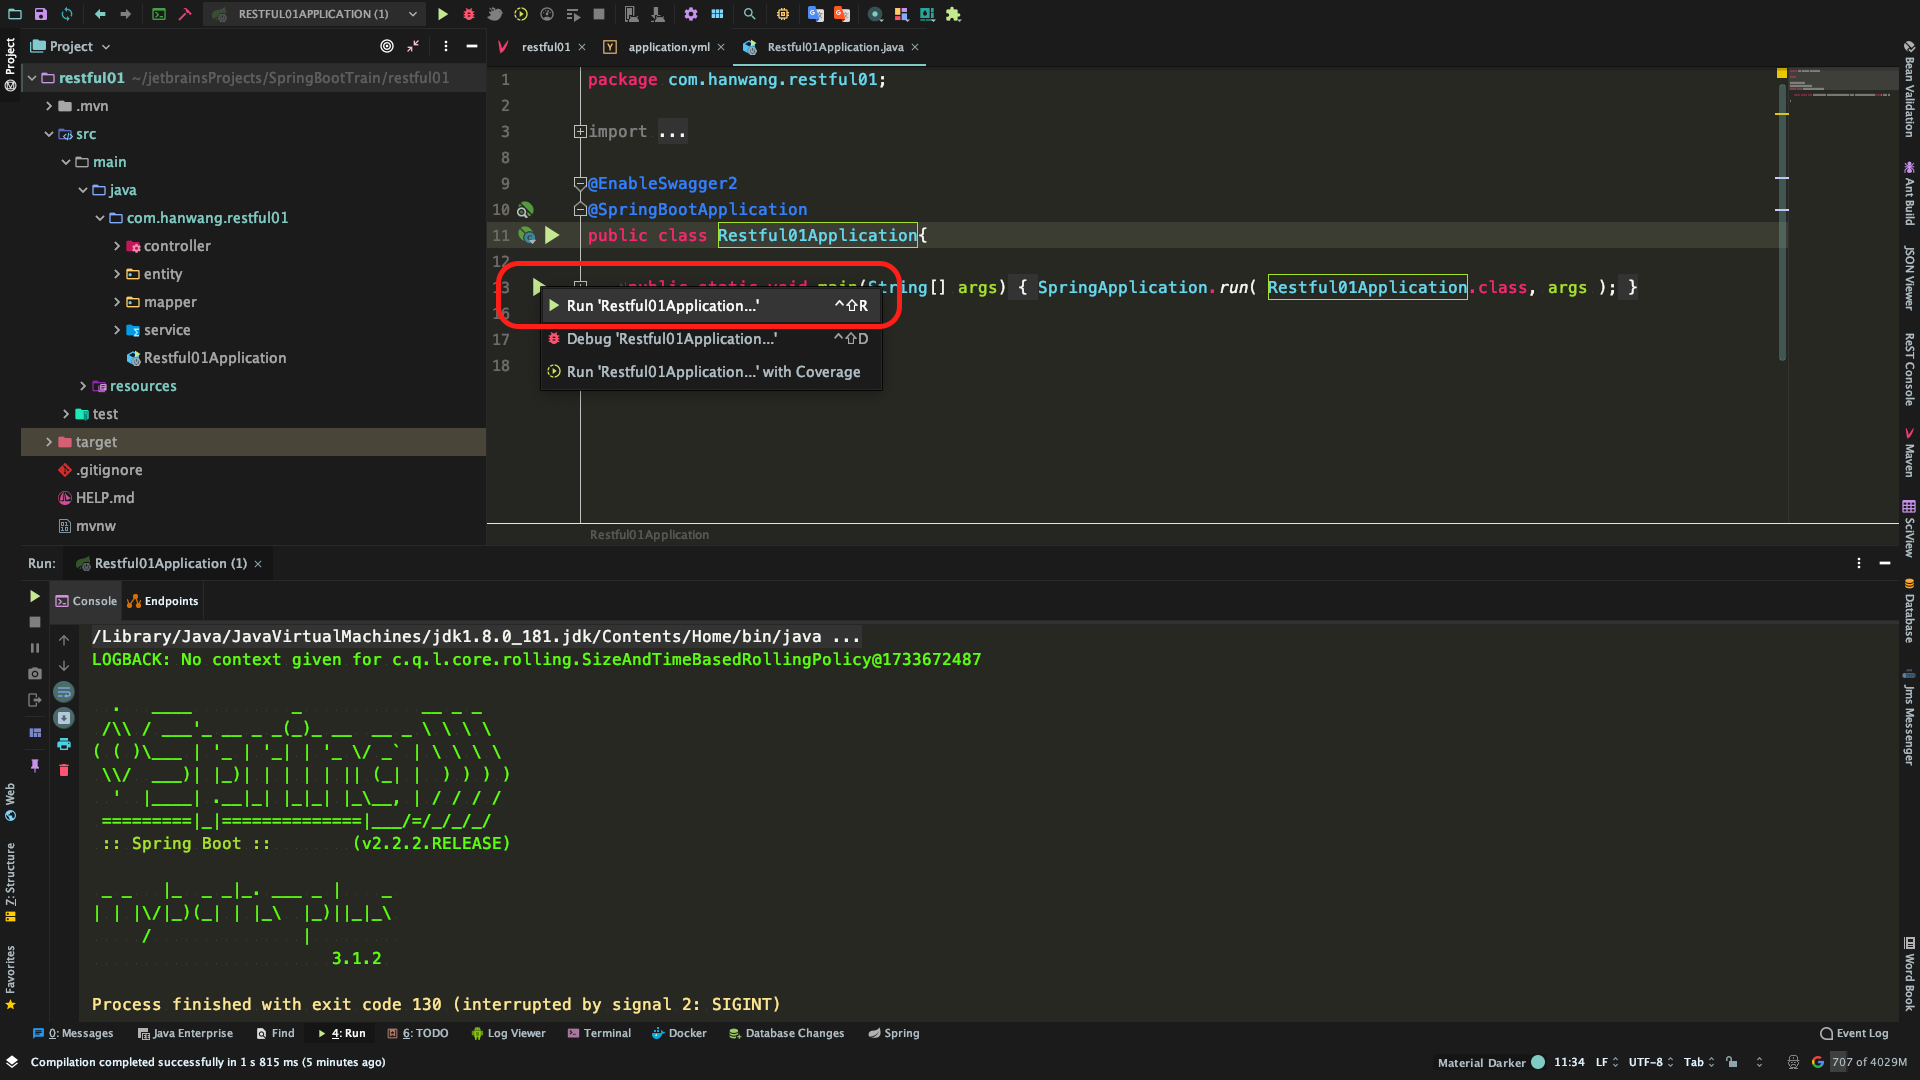
浏览器测试
http://localhost:8088/api/swagger-ui.html |
五、换种姿势开发
正确的开发方式:使用
Mybaits Plus代码生成器进行开发
-
删除刚刚创建的
entity、service、mapper、controller包,及里面的所有内容 -
修改模块入口文件
Restful01Application.classimport org.springframework.boot.CommandLineRunner;
import org.springframework.boot.SpringApplication;
import org.springframework.boot.autoconfigure.SpringBootApplication;
import pub.gadfly.sdk.Utils.MybatisPlus;
import springfox.documentation.swagger2.annotations.EnableSwagger2;
2
public class Restful01Application implements CommandLineRunner{
public static void main(String[] args) {
SpringApplication.run( Restful01Application.class, args );
}
public void run(String[] args){
MybatisPlus.generator(Restful01Application.class);
}
} -
运行模块 --> 停止运行
-
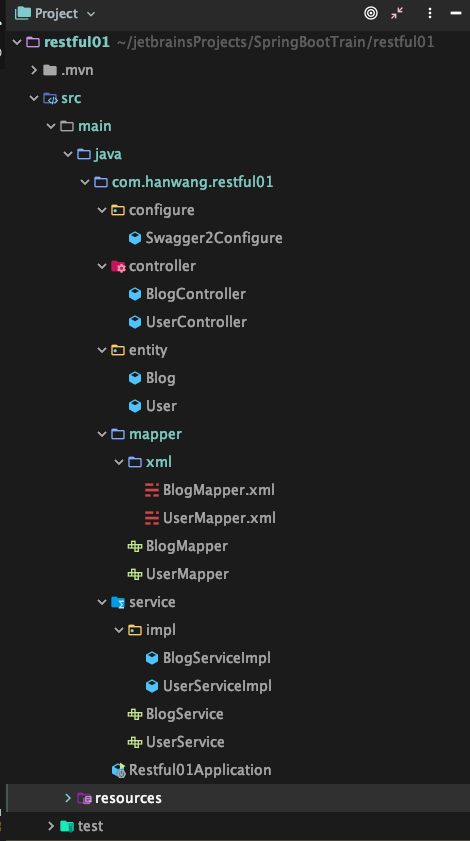
自动生成代码
![]()
-
注释掉代码生成器
import org.springframework.boot.CommandLineRunner;
import org.springframework.boot.SpringApplication;
import org.springframework.boot.autoconfigure.SpringBootApplication;
import pub.gadfly.sdk.Utils.MybatisPlus;
import springfox.documentation.swagger2.annotations.EnableSwagger2;
2
public class Restful01Application implements CommandLineRunner{
public static void main(String[] args) {
SpringApplication.run( Restful01Application.class, args );
}
public void run(String[] args){
//MybatisPlus.generator(Restful01Application.class);
}
}